Thursday 30 October 2014

Springy Spring Is Springy

I've been waiting for a number of parts to arrive so I could get back into resolving the poor performance of the AUG. The cylinder is the biggest thing, but I also finally got the M135 spring and grease that was highly recommended for AEG internals (Team Associated Green Slime). Now that I had all the pieces, I opened up the gearbox. And of course there were some hiccups therein.

To start off, I unpacked the cylinder (an SHS brand steel one in case anyone is interested). I had read that polishing the inner surface is a good idea, and luckily I had some 0.3 micron lapping film left over from when I tried to sharpen my straight razor years ago. It worked pretty nicely and after a while I had a pretty nice shine going.

I then opened up the gearbox. This time I managed to keep the spring in check with a screwdriver and also remembered to release the tappet plate spring, so no parts flew out today. Again using the Scho-Ka-Kola tin, I collect all the small pieces so as not to lose anything.

A quite a while earlier I had already bought an aluminium piston and piston head which I thought would be great replacements for the originals. But as it turned out, I couldn't use them without a new spring, because the original spring has a twist on the end and as such was only compatible with the original piston assembly.

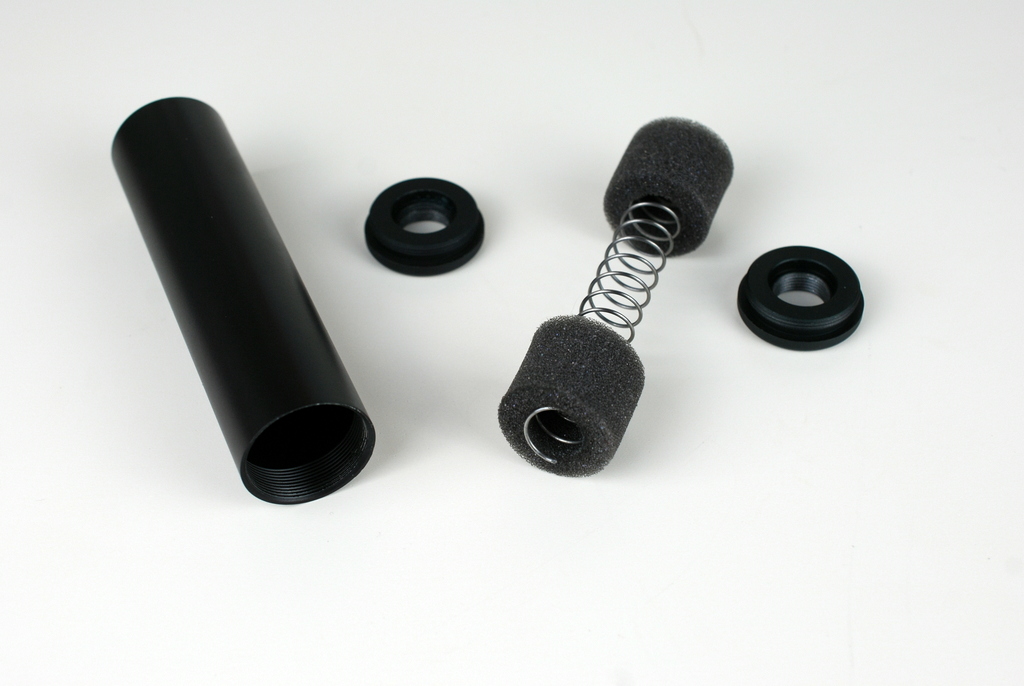
The original piston, piston head and spring taken apart. The front end of the spring has a twist which rides in the groove of the metal piece in the middle, which again has a raised section that aligns with the groove in the piston. 


Now that I had the new spring, so I could finally get to work. But it wasn't that easy, of course. As it turned out, the piston I had was not exactly round, but rather flattened on the end. It also had some strange pitting in places, so I slowly began to question its quality. Since the piston was not round, it wouldn't slide freely in the gearbox, instead getting stuck around halfway. At least I was smart enough to test it out before putting the whole box back together only to then wonder why it is not working.

Metal piston, 1, non-round


I started fixing the piston by simply sanding the sides, hoping this would give me enough clearance, as well as make the piston slide better due to added smoothness. It didn't really do the trick, though. It was still getting stuck on the sides when the gearbox was kept closed by simple finger pressure alone. Something else had to happen, clearly. I reasoned that I could reshape the piston with some pipe pliers once they're set to proper size. It turned out to actually work, as I slowly progressed from the end towards the head, carefully pressing down from several angles.

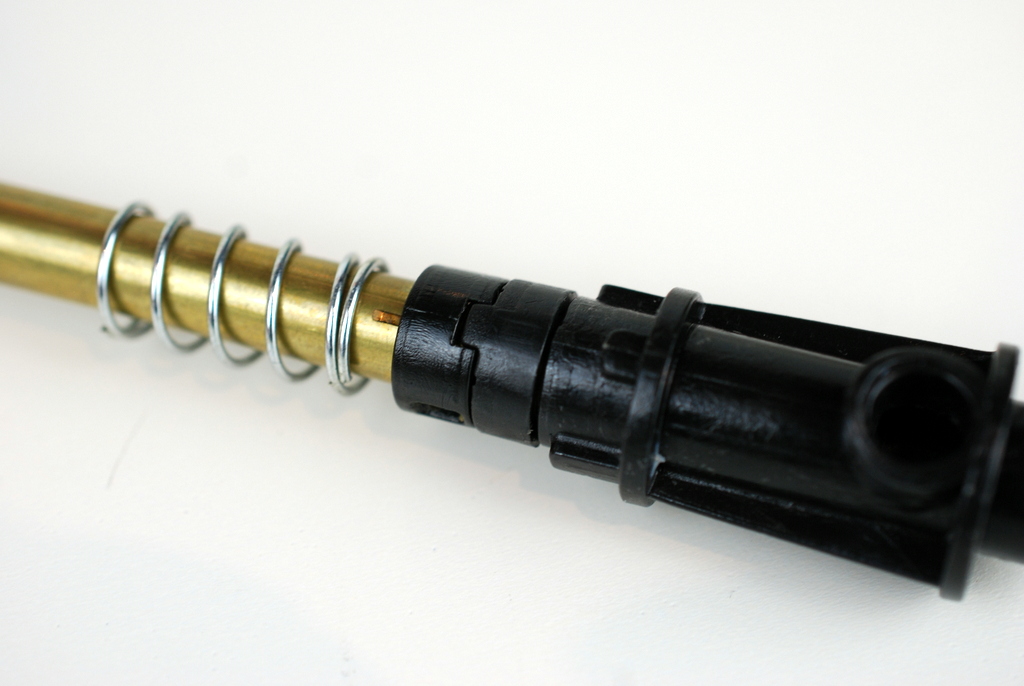
Sanded and reshaped with pliers


The piston was now at least round enough to move freely. Attaching the piston head was a rather simple feat involving a screwdriver and some finesse. The piston head sat a bit crooked on the piston, though, so I had to take it back off again. The crookedness was alleviated by adding a thin metal washer behind it.

Next, finally, came the spring. I was most eager to finally get a proper spring in so I could really start making the AUG into a DMR (and being able to bring it back into games as well). I soon found the error in my thinking, though.

The default spring guide in the AUG is a plastic one. It's sturdy enough to hold the default spring in check, but the new, stiffer one was much too much for it to handle. As soon as I managed to stuff the new spring in and ever so slightly let go of it, the natural tendency of the spring to extend did the spring guide in. The only thing holding the spring in place was a small plastic tab on the rear of the spring guide, which was mated with a hole on the gearbox shell. As you might have guessed, it was no match for the spring at all. So out popped the spring and off popped the tab. Determined to get this thing together today, I picked up the gears that had flown out, placed them back in, and retried the whole operation. I turned the spring guide around to use the other tab that was still in place, but very soon got the exact same result. So now I was left with a spring guide with no tabs on, and a spring that I could not keep in place long enough to actually put the gearbox back together.

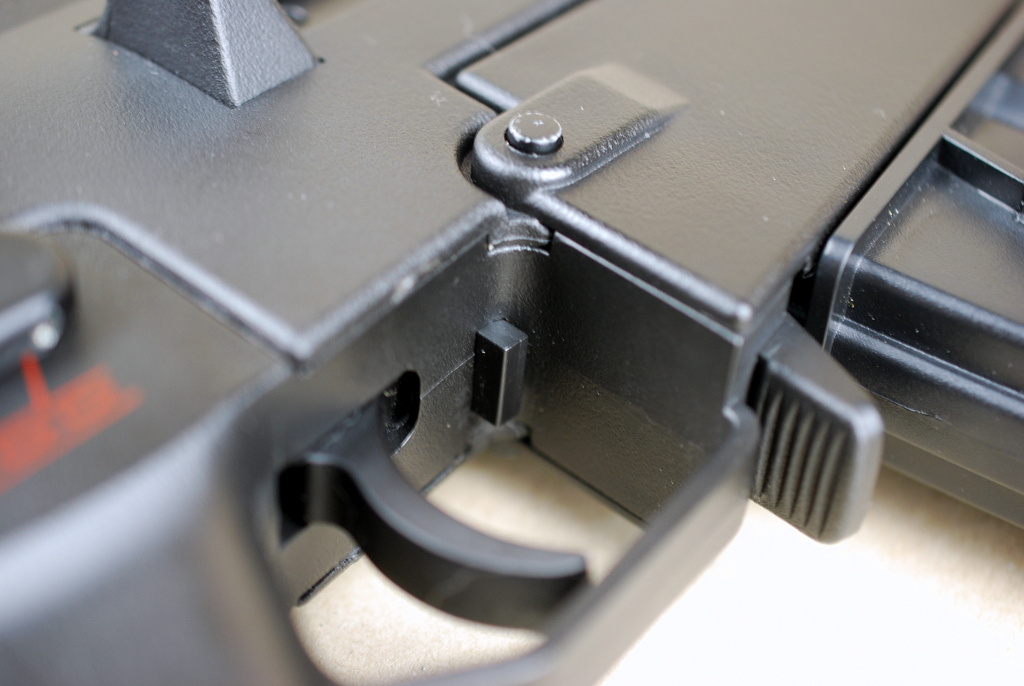
The sorry excuse for a spring guide. You can clearly see where the tab used to be on this side


I just had to admit defeat and put the old spring and piston back in, again. At least the new cylinder was in so there was at least some improvement over from where I started. The trigger pieces made me want to pull my hair out, again, because it took several tries to actually get them to sit still long enough to line up the gearbox shell and all the pieces inside. If the gears were properly aligned, the trigger pieces weren't and vice versa.

I finally got it back to working order, though, and sighed in relief. This thing is starting to drive me nuts, seriously. A steel spring guide is on order, so I'll get back on this once it arrives.

Wednesday 29 October 2014

AUG Magazine Feed Improvement

My AUG magazines are made by King Arms, and occasionally they will stop feeding because the BBs get jammed between the follower and the magazine inner wall. I read about this fix somewhere online and decided to try it. This should work on other manufacturers' magazines as well as long as they are made the same way.

The main problem, by my understanding, is that the follower shape doesn't stack the BBs evenly into two rows, so they get stuck occasionally when there are only few left and the magazine spring is beginning to be extended to its full length (and is thus pushing the BBs only weakly).

To get to the follower, I opened up the end cap of the magazine. A simple half-twist with a flat-head screwdriver did that trick.


The spring popped out partly from the magazine and I could then just pull the rest of it out. Good thing I wasn't looking at it from too close up or I would have been hit in the face.


The default follower has a rather angular shape so the BBs can go on either side of it in the feed chute.


The desired result was a follower that has a clearly slanted surface shape. Using a rotary tool with a grinding attachment, I took material off slowly, until I was happy with the shape.


After this there was not much to do apart from reinstalling the follower and spring. Easier said than done, though. There's quite a bit of spring to work into the gun and there's definitely some finessing involved in getting your fingers out of the way and still being able to screw the end cap back in place.

Definitely not what I'd call a tight fit here between the follower and the feed chute. I guess this is part of the problem.


A bit of fiddling later I had the end cap back in place and the follower showing at the top.


Some quick testing would seem to show that this is an improvement (or at least it doesn't make it worse). I'll have to try it out in a game situation to see how well it actually performs, but it's looking promising. I've only modified one of my four magazines like this so I can compare how they work.

Monday 20 October 2014

Monday Night Throw-Down

It was supposed to be game day yesterday, but it was sadly cancelled. Determined not to lose the whole day, I borrowed the team chronograph so I could actually measure all my guns once and for all.

Nothing magical, really, I set up a cardboard box filled with a couple of pillows to catch the BBs and shut myself in the study so the cats would stay out of the way and be safe. I stood the chronograph up on a smaller box, gathered my guns and loaded one mag each with 0.20 g BBs.

I also had 0.25 g BBs which is what I normally use in games just for comparisons sake. And it's a good thing I did, because I got some interesting results.

As I mentioned in an earlier post, the AUG has a ported cylinder whereas it should have a non-ported one. After shooting with the ported cylinder, I took out the gearbox, cleaned the outside of the cylinder and put a piece of thick foil and duct tape on top of it to simulate a non-ported cylinder.

In another post I mentioned that the G36C has a screw-adjustable power setting, so I tested it with both the maximum and minimum setting.

I shot around 10 shots per each gun and BB weight and calculated the average. The results of my shots are collected below.


Gun 0.20 g 0.25 g
AUG ported 93 m/s (305 fps)  74 m/s (243 fps)
AUG non-ported 97 m/s (318 fps) 87 m/s (285 fps)
G36C min 109 m/s (356 fps) 96 m/s (315 fps)
G36C max 125 m/s (410 fps) 106 m/s (348 fps)
P226 91.5 m/s (300 fps) N/A


I find most curious how the AUG performed with the ported and non-ported cylinders. The ported seems to give very very different muzzle velocities dependent on BB weight, whereas with the non-ported (well, jury rigged) there's a much less noticeable difference between the BB weights. It's still underperforming a lot when compared with the other rifle. Even on the low power setting the G36C wipes the floor with the AUG, not to mention when turned all the way up. So does the green gas powered P226.

At least the new nozzle is making an obvious difference on the AUG, which was shooting so poorly in the beginning. Still, I'm looking forward to finally getting the spring and the new cylinder. They should finally make the AUG perform the way it should. I'm thinking I might make it into a Designated Marksman Rifle just to see how that works out.

Saturday 18 October 2014

Hard To Port!

As I wrote just a few days ago, I opened (and reassembled) the AUG gearbox for the first time. I wish I'd left it disassembled, because I just found out that one further reason I'm getting such a sucky amount of power is that it has the wrong kind of cylinder for its barrel.

The air volume of the cylinder should match or exceed the volume of the inside of the barrel, as far as I've understood from reading things online. Since all (well, vast majority) cylinders are the same length, the way to reduce the effective volume is to cut a hole (or port) to the side of the cylinder so the air escapes until the piston passes that spot.

You can refer to this chart I found on the Airsoft Society forum if you're interested in the different types.

The AUG has a very long barrel, 509 mm. That is matched with a solid, i.e. non-ported cylinder. What has been used on the JG assembly line (I recently found out that ASG AUGs are JG manufactured rebrands), however, is a 3/4 ported one, which has a lot less volume, so the air pushing the BB along the barrel "runs out" before the BB has exited, resulting in loss of power.

I've ordered a new cylinder, so now I'm again patiently waiting for a delivery. And I will need to do battle with the gearbox again.

Friday 17 October 2014

G36C Tilted Flash Hider Fix

There's one thing that's bothered me a while now with the JG G36C, and as the title suggests, it's the flash hider. As it comes out of the box, the hider isn't screwed all the way in, rather it sits a few twists away.

The retaining screw, if tightened properly, pushes the nose of the flash hider up so it's no longer aligned with the barrel. If the retaining screw is left loose, the flash hider can move around. One of my worries is that in either case, BBs might be hitting the flash hider and going every which way.

I've used a scale modelling cutting mat to further illustrate the problem

If you do loosen the retaining screw and screw the flash hider on as far as it goes, it will sit straight.

No more tilt

But then the prongs of the flash hider are no longer properly aligned, and the retaining screw will be in the wrong position.

Retaining screw at around two o'clock position when looked at from the rear

If you're happy with this situation, then your tilt issue is fixed. I wasn't quite pleased here, however, so I sought some other options.

First I thought I could alleviate the problem by simply making the barrel threads tighter with some PTFE tape.

PTFE tape around the threads. You can also see the dents left by the retaining screw on the flat section of the barrel.

The tape was not enough to fix it, though, so I went further. If I could, in effect, lengthen the barrel a bit, the flash hider would tighten at the right spot. I noticed there's a nice flat area inside the flash hider.

Looking into the flash hider from the rear

A properly sized o-ring there would net me the effect I need. Sampling from my sorted o-rings box that I recently bought, I found the fitting one: 9.5 mm (3/8") by 12.7 mm (1/2").

The o-ring placed in the flash hider

With the o-ring in place, I screwed the flash hider back on, and it tightened just right where the retaining screw is pointed downwards.

Fitting tight, retaining screw at 6 o'clock position

The o-ring keeps pressure on the threads, so the flash hider is unlikely to unscrew itself even without the retaining screw, but it's best to tighten it a bit just to be sure. No need to twist it to even close to maximum tightness, though.

Finished fix. Flash hider sitting snug and straight


Thursday 16 October 2014

What's In The Box?

I have on this day opened up my first ever AEG gearbox. Wow. So many parts both big and small. The AUG runs off of a V3 gearbox, with a short type motor (I had to find out this information, naturally. Took a bit of googling, but there seem to be pretty good resources abounds if you know what to look for). I'll be adding pictures to this post a little later.

My plan was to install the bearings and the air nozzle that arrived today in the mail, as well as shim the gearbox anew and de-grease and re-grease everything. 

Opening the gearbox sensibly is not too hard to do if you know what you're doing. Luckily I had checked out some Youtube videos beforehand to see how to do it best. The most likely problem area is the main spring jumping out, which I avoided by placing a small screwdriver in the back of the spring guide and pressing down on it. Or so I thought. I didn't push down with quite enough force, and naturally the spring jumped out the back somewhat, throwing gears around somewhat. At least nothing got lost.

I've read the most likely places for air leaks are the cylinder head and the air nozzle, so I decided to test them out first. I didn't quite remember to release the tappet plate spring though, so that naturally jumps back as I lift the cylinder out of the gearbox.

After getting all the parts out of the gearbox, I put the gears to soak in a glass of turpentine to de-grease them. All the small bits go to a Scho-Ka-Kola tin so they don't get lost. 

First I just tested the tightness of the cylinder and cylinder head. There is some leaking, but a few twists of PTFE tape and it's gone. As suspected, the nozzle, too, leaks like crazy. After switching over to the new, o-ring sealed SHS aluminium nozzle, there is no leak. I'm hopeful this will bring my power back up.

The new bearings didn't quite fit in so I took a file and ever so gently enlarged the holes. Now they fit, but are also loose enough to fall out when not held in place. I guess it's still fine. I did the shimming after watching several videos and reading up on it. Everything seems to run rather smoothly. There's some play on the gears, but I guess it's better to have them too loose than too tight.

I greased everything up with teflon grease and started to reassemble the box. The AUG has a selective trigger that allows for both semi and full auto simply by the shooter varying the trigger pull length. Short pull gives semi shots and pulling it all the way is full auto. The actual trigger actuation system must have been designed by a rather sadistic engineer, though, since it is made of two separate pieces that are not actually connected, and both are simply held in place by the gearbox shell.  

When I finally got it all sorted out and the box back together and tried to run it, I noticed there was something weird. The anti-reversal latch would not activate at all. I soon realized there should be a spring on it, but where the hell was it? About 20 minutes of frantic searching later I find it lying on the floor about two meters from where I was originally sitting. The spring must have flown out as I was taking the gears out. 

As if looking for the minuscule missing spring wasn't stressful enough, now I had to take the gearbox apart again so that I could get the one, tiny spring on. Same problems with the trigger pieces, same fiddling around and the need for at least three hands that are much smaller than I currently have. 

I think I'm going to see nightmares filled with springs and gears tonight. At least I'm ready for bed, that's for sure.

Sunday 12 October 2014

G36C Field Day

Another fun-filled game day behind me, I now have some first-hand experience of the JG G36C in action. I arrived an hour early with the friend who first got me into the hobby, in order for us to zero our sights. I could immediately tell there's a lot more power than there is on the AUG. The default hop-up seems to be doing its job quite nicely too, I'm getting great range. The short barrel of the G36C does seem to have some effect on the accuracy, so my shots aren't quite as consistent. I was expecting that, though, and the trade-off between accuracy and handling is more than acceptable in my opinion.

I know I complained about the distance between the bore and the sights regarding the AUG earlier, but this thing has it double. At one point I was pinned down behind some trees and rocks, and decided to crawl a bit to get to a better position. I manage to ninja my way forward about 5 metres and not be noticed. I get the drop on the guy that was suppressing me, but sadly as I took aim and fired prone, I only managed to shoot up some leaves and dirt in front of me. Naturally I got spotted by him and caught an expertly planted BB on the shoulder.

That is some serious distance ("Serious distance" defined scientifically today as "about 10 cm or so")

I called the hit, got up and started walking back to the off-game area. That's when I noticed my drop-leg holster with the P226 in it had twisted forwards around my thigh and had dragged along the ground as I crawled, netting me a nice collection of dirt, pine needles, twigs, leaves, squirrels, and other typical forest ornaments. Maybe it's time for a different holster? I'm starting to notice this hobby is very good at creating shopping needs.

Otherwise I was quite happy with the day. The G36C has some sideways wobble on its stock, but I'm thinking there's a pretty easy fix for it. I'm definitely stoked with my purchase.

Friday 10 October 2014

Silencer Painting

A while ago I ordered some bits and pieces from an online airsoft shop. Among them was a silencer I thought might look nice on the AUG. It wasn't quite what I expected, though. The shop picture and description said it is all black. It wasn't.

Seriously? The text is possibly one of the most childish things I've seen in a long while. Want to come across as a try-hard operator? We have just the thing for you.

As you might imagine, I wasn't too happy with what I got, and it got even worse. I wrote a polite complaint email to the shop, only to be told that "[...] we want to report That mistakes in product description and photos it can not be basis for complaint. [...]" So apparently you're buying blind and can get whatever sorta kinda maybe looks like it does in the pictures but not necessarily. Some back and forth later I still could not get a straight answer whether or not they'd be paying for return shipping so I just decided to drop it and not shop there ever again. You'd expect a shop that sells and ships internationally to manage to employ people with the ability to construct comprehensible English sentences (or even a simple apology), but that apparently isn't the case.

I turned my fuming into productive energy by taking the silencer apart and sanding down the text parts. I started with a 600 grit paper and finished off with 1200 to smooth it down.

The end caps screwed off and the foam-spring insert removed

A simple piece of steel wire, a screw and a cardboard box made for a pretty good painting set-up.


Three thin spray paint layers later I was pretty happy with the end results. I allowed it to dry overnight and then reassembled the pieces.

The end caps are the original colour, but the difference is quite unnoticeable under natural light conditions

Nothing super special here naturally, but I thought I'd still document this thing. Too many times I've messed up painting something by applying too thick coats and then have the paint run. Patience is definitely key.

Monday 6 October 2014

G36C - The Arrival

So, the G36C and magazines came in the mail today. What can I say, I'm already in love. I know it's beyond ridiculously silly, but ever since first playing Modern Warfare, this gun has had a special place in my heart.

There she is! The gun is a JG G36C, 3rd generation. The magazines are D-Boys midcaps and hold around 100BBs each. Not pictured is the 1100mAh mini-type NiMH battery it ships with. Battery compartment is in the front handguard.
The gun feels really solid for a plastic framed piece, and it has some serious weight to it. The stock folds to the side and snaps back in place nicely.
Magazine release is the paddle-type, similar to the MP5 and AK series, for example.
 

The rear sight is adjustable with windage adjusted by the hex head screw (2.5mm) on the side, and elevation is controlled by an identical screw on top.


The hop-up adjustment is accessed by pulling back the charging handle. The tilting plastic tip seems prone to snapping off, though.


Once pulled back, the charging handle head can be dipped down for easier hop-up adjustment. I don't know if this is by design or not, but it's handy.

Charging handle held in place, the hop-up adjustment wheel visible through the opening
One of the coolest features is a 2.5 mm hex head screw at the back of the gearbox which you can access by folding the stock. It allows you to set the power of the gun for both QCB and field conditions. Screw in for more power and out for less.

The adjustment screw is just out of sight inside the hole at the back of the gearbox
The attention to detail is remarkable. Even the bolt release from the real steel original is modelled, though it is non-functional.

Bolt release button inside the trigger guard, front of the trigger
The gun comes with one short accessory rail under the handguard.

There are attachment points for extra rails on both sides of the handguard as well
The D-Boys magazines are a slightly tight fit, but with some use they fit in very well. I don't think any filing or sanding is necessary, just practice your mag change a couple of nights and you're set. That's what normal people do on normal nights, right?

You can just about see where the magazine connects with the magwell and the slight scuffing that's left behind after some furious reload drills
Perhaps the only downside I can think of at this point is the fact that with a proper cheek weld, you don't really get a sight picture at all, because your eye will be so much lower than the sights.

This is pretty much the view you're greeted with when your cheek is on the stock
I'm definitely fielding this baby the first chance I get. Since the AUG is under performing so horrendously, I'm making this my number one gun, at least until the AUG is back in action.
I moved the reflex sight over to the G36C, and am trying out the vertical grip that I got with the AUG. It never really fit on there, but here it seems a lot better. The cheek weld problem is naturally further emphasized with the reflex sight since it sits even higher up, but at least you don't need to align two sights, it's enough to see the reticle.
I wish it was game time already.

Cool and collected

Sunday 5 October 2014

A Problem of Chronographic Proportions

It was game day again. One member had brought a chronograph so that we could see how our weapons actually perform. I had read on several online shop descriptions that the AUG should be shooting around 100 m/s (330 fps) out of the box. When my turn to step up to the chrono came, I was seriously disappointed to see that the best reading I got was 78 m/s (256 fps). The average was around 76 m/s (249).

Something is obviously wrong, either the hop-up leaks like a sieve or there's something wrong with the gearbox. With the G-hop mod I get damn good range, but it takes the BBs forever to get there. The game itself was still fun, even though somewhat overshadowed for me personally by the poor performance of my gun. I now had real, indisputable evidence that it was a bit sucky. Now I'm really looking forward to the new spring arriving. Hurry up, Mr. Postman!

Friday 3 October 2014

Angled Foregrip Modification

Just a quick modification I did to the angled foregrip I have on the AUG. Due to the way the rail is constructed, there are obviously only a set number of spots where you can put the foregrip and still have the retaining screw go through.

Right now the foregrip sits a bit too forward for my tastes both visually and ergonomically.


It's not possible to move it towards the rear any further, since the edges of the foregrip touch the front edge of the receiver. To fix this, I decided that I'll cut small bits off the foregrip to make it fit.

First I measured the distance between the rail mounting nubs so I knew how far the grip will move back if I move it one step. Then I measured the distance front the current grip rear edge to the receiver front edge, and by deducting one from the other, I knew how much I need to cut off to make the fit.

I marked the bit to cut off with a pencil on the grip, and took my trusty Cotech multitool, planning to simply grind away the needed amount. The grit on the grind attachment proved too fine and the grip build material too sturdy, so I switched to a cutting disc.

With careful, slow cutting I soon had the necessary pieces removed.


Trying the now modified grip on, I was very happy my calculations worked as intended.


A very simple mod, but I'm happy how it worked out. The grip now sits about one centimetre further back and both looks and feels nicer.

Thursday 2 October 2014

G-hop Mod and New Goggles

Like I said in yesterday's post, I broke the AUG's hop-up bucking. Today I got a new one from a local shop, and also decided to buy goggles... somehow. As I've said before, the mask is not ideal since you lose so much peripheral vision. Now I have a pair of clear BollĂ© Tracker II goggles. They fit nicely and do not limit my vision basically at all. They come with a bag, cleaning rag and an elastic band that connects to the temples.

G-hop Mod

I'll preface this by saying that I've used this G-hop installation video from Youtube user TopHatRunner as a guide to building my G-hop, so all credit goes to him. I'm mainly paraphrasing it below.

If you're doing this mod, you'll need the following:
  • an extra hop-up bucking
  • a sharp knife (x-acto or similar)
  • small file or sandpaper
  • superglue
  • (optional) tweezers
  • (optional) toothpick for spreading the glue

Installation

This guide only applies to the AUG regarding the hop-up unit removal, otherwise it's standard for any AEG as far as I know.

To start, remove the barrel with the hop-up unit.


Remove the hop-up unit clamp to release the unit.


Remove the hop-up unit by gently pulling and twisting at the same time. Make sure the hop-up bucking does not get caught in the unit.


With the hop-up unit removed, gently pull off the hop-up bucking.


Gently turn the bucking inside out, beware of tearing it. You can use a blunt tool, such as a hex wrench, to help you.


With a sharp knife, cut off the excess of the nub on the inside of the bucking. Finish off with a file or sandpaper until you're flush with the rest of the surface.


Repeat the above with the ridge on the opposite side, and place the bucking aside.


Take the other, extra bucking, and cut out a patch that just covers the window on the end of the barrel. If you make it too small, you can't glue it on properly. If this happens, simply cut out another patch.


Apply a thin coat of superglue on one edge of the window. Use a toothpick or similar to spread the glue. Place one end of the patch onto the glue. Tweezers are a great help at this point. Once the glue is set, apply a similar thin coat on the other edge of the window and glue the other end of the patch on.

Once the glue has set, simply turn your modified bucking back right side out, and slide it back onto the barrel. Make sure the ground down bits are on the sides of the barrel, and not on the patch you glued on.


Take your hop-up unit and adjust it all the way off. Reinstall the hop-up unit in the same manner as you removed it, and install your barrel back on.

Test shoot to see the effects. You will most likely need a lot less hop than you've used before, since the contact patch in the barrel is larger. If you're seeing your BBs veer off the either side, your hop-up unit is likely tilted to one side. Remove your barrel and adjust.

I'm getting great range and consistency with this rather simple hop-up mod, hope you will, too.

Wednesday 1 October 2014

Time for Improvement

Since the apparent poor performance of the AUG the last game, I've decided to delve into the matter. Several online shops say it has about 100 m/s (330 fps), but I feel I'm not getting that much. I've read something about gearbox modification and since I love fiddling with all sorts of devices, I've come to the conclusion I can make it better.

A tougher spring seems in order since that is the source of the gun's power. Having taken the gearbox out, I see it's also got plastic bushings. Apparently those should be replaced by metal ones. There seem to be either bushings or ball bearings available. I'm thinking proper ball bearings will be better, since they'll make the gears glide even better.

A better air nozzle should also be installed to make sure there are no leaks in there, so I now have on order an M135 irregular spring, some metal ball bearings, and an aluminium, o-ring nozzle. That should do the trick.

I've also read about a hop-up mod I'm interested in trying; the G-hop. Sadly, I managed to break the hop up rubber trying to take out the barrel. The barrel sleeve (an aluminium tube between the inner barrel and the outer barrel) seemed to have somehow been flattened in a certain place, and stupidly I held onto the plastic hop-up unit while trying to pull out the barrel. Of course the hop-up unit gave in, and I tore the rubber into bits when pulling in frustration. I'll get a new rubber tomorrow for the mod, the unit itself seems to still be in one piece.