Showing posts with label AK-47. Show all posts

Sunday, 11 October 2015

Oppan Pistol Style!

The AK platform is an iconic one, and one that I personally like a lot. Over the summer I bought the TM AK-47, and ever since I've been looking for a metal body for it. I don't really enjoy the plastic one that much, and it's starting to crack anyway. For this purpose, I bought an old, non-functioning second hand AK that had a Guarder body on it. My plan was to strip the internals for parts and use the body for the 47.

The previous owner had, however, installed an AR stock on it using some creative brute force, and had cut down the barrel all the way up to the gas tube. The gun had also been painted black all over and later at some point had also had some dark grey splashed on it from another paint job.


The AK stock attachment point had been cut down and the AR stock tube was attached via some large pop rivets. The sling mount had also been taken off, leaving a simple hole on the side.


I didn't exactly fancy the attachement, and since the stock attachment had been ruined, putting on a full AK stock was not really an option.

This project took its first steps when, about a month ago, me and my SO went to a local convention dressed in some Mad Max inspired wastelander gear, and the AKs were an obvious choice for the costumes. I gave her the TM and took the new shorty for myself. To make it even more interesting, I cut down the rest of the stock attachment and added a simple sling mount by bending a nail to fit the slot.


After this, the gun was left alone, until now. Since I could not use the body for the TM, I decided to go another way. I'd stumbled on the Draco carbine on the Internet, and decided this beaten up veteran would be the perfect material for such a build. My plan was thus to build a very short, stockless AK to use as a CQB gun.


Internals check and update

I stared off by cracking open the gearbox so I could see what I had bought. Inside were steel gears, a swiss cheesed piston, a motor that didn't turn and pretty much no lube of any kind.


The motor didn't react at all even with power clearly running to it, so I declared it dead. I found it easier to swap it for a stock JG motor that I had lying around from the AUG DMR build than to try to figure out what was wrong.


With the new motor I got the gearbox to turn very nicely on a 7,4V LiPo, but once I chronoed the gun, it was shooting way too hot for CQB.


I found out I could use almost all of the parts on this build that I had left over from the AUG, since the piston, spring and cylinder from that were also very useful here. The cylinder that was very wrongly ported for the AUG was a great fit for the to-be short barrel of this build. The spring was between an M90 and M100. I did a simple AOE correction with a nylon washer and achieved a very nice result by just using the one.


Since I was building a CQB weapon, I though a bit higher ROF would be in order, so I put in 13:1 gears and a sector clip from CORE.


The gun also came with a self made mosfet but no fuse, so this was the perfect chance to try out the new flat fuse holders and 30A fuses that I had ordered earlier.


External work

As I was planning to build the shortest AK I could, I had ordered a new AKS-74U style front sight and gas block some time ago.


Also on the list of things to definitely take care of was the rear of the body, which at current had a gaping hole on the end, as well as the hole for the sling mount on the side. I had decided to close up the hole on the side and fit an end plate with a new sling mount. I stared off by filing down the nubs of the stock attachment point.


Lots and lots of filing later I took a metal plate from a pile that I had collected somewhere years ago. If I remember correctly, these were back plates for hooks that held cat food samples on a stand somewhere, and I'd held onto these for years. Not in vain, though! The plates had a nice hole right in the middle, which was perfect. 


The plates were also soft enough to cut through with tin snips, which made my work easier. After cutting the plate to size I attached it with chemical metal, and used the leftovers to fill in the original sling mount hole.


Once the metal had dried, I went back to filing and then sanded everything down with wet sandpaper to achieve a smooth surface.


Any gaps that were still left over at this point I filled with filler putty and re-sanded. My hope was that once painted, my additions would be invisible. The sling plate I had in mind was one that was originally intended for an P90 or MP7 that I had bough together with the front sight. It seemed perfect for the job, since it came with an attachment bolt and I had a fitting nut for it. The hole on the back plate had to be enlarged with a round file a bit for a perfect fit, though.


As the rear was now well in hand, I moved onto the front end. I had to shorten both the outer and the inner barrels as well as fit the new sight and gas block, as well as re-finish the hand guard and pistol grip. To start, I noticed the front sight would not fit on the end of the gun's gas tube, so I had to file down the hexagonal attachment point quite a bit.


In fact, I had to file it down so much that in the end I gripped the gas tube (which in reality was an upside down half pipe) so hard that it simply gave in. To be honest, at this turn I did sort of feel that everything had been going suspiciously smoothly up until this point.


Luckily, again, I had stockpiled stuff from before, so I had on hand a short metal pipe that fit the inside of the fake gas tube perfectly. After applying some more chemical metal, I was back in business. The pipe fit inside the receiver and was held in place by the chemical metal, while the pieces of the half pipe and the end cap were glued onto the pipe using the same material.


Now that the gas tube was in once piece and the front sight fit onto it, it was time to check the length of the barrel by using the barrel mounting bracket which would also hold in place the lower hand guard piece. Naturally, the front sight and the bracket were completely mismatched. The front sight had a piece that would not fit in the notch on the bracket, as well as a short fake tube which the bracket simply had no place for. 


You may have guessed it, but I went to the saw, the file and the chemical metal once again. I first did a rough cut so I could actually fit the two pieces together.


And then used the chemical metal to form an easily malleable surface that I could grind into shape.


The end result was a more than pleasing fit, so I could finally move onto the barrel. The cut done by the previous owner was not a very pretty one, so I decided I would do so much better by using a proper pipe cutter.


Had I been smarter, I would have cut the barrel from the other end, but because this is not the Let's Do Everything Right On The First Go blog I cut down the barrel from the front end, thus getting rid of the narrow front section which, you guessed it, is the one that fits inside the sight base. My only choice was, again, the file and coupled with a lot of patience. I have never before, up until now, wanted to own a lathe so bad, or at all, in my life.


Later on I also noticed I had cut the barrel a couple of millimetres too short, and had to file a bit more off in order to drill a hole for the screw that would actually attach the front sight onto the barrel. Once that was done and I had drilled the hole with possibly the dullest drill bit in the world, I went to happily tap it with a steel screw (because the barrel was aluminium, I was certain I could tap it just by turning a screw into the hole). That went nicely until the screw head broke off, leaving the screw in the hole. For a few moments, after a session of middle to severe level swearing, I tried to drill through the screw. No luck, so I drilled another hole. Which was not in the right spot. Third time's the charm, damnit.


Now that the front section finally fit together somehow, I could cut down the inner barrel, put the whole thing together and test fire it for the first time. The funny thing about pipe cutters, however, is the fact that they tend to, by their very nature, squeeze the material, which I did not entirely take to heart until the chrono failed to show any results.


I had a phillips screwdriver which had the perfect size to act as an ad hoc reamer, and soon the BBs would actually fit through the barrel. The technical side of things was now done and I could finally move onto the finishing stages.

Finishing up

I started off by setting up a paint shop in my bathroom, and spray painted all the external parts with three coats on all sides.


Instead of the original black, I wanted the hand guards and the pistol grip in the original colour so, off I went, sanding away until all the paint was gone.


The end result was, unsurprisingly, rather dull in its appearance. I decided to lacquer the surface for a proper finish.


As a final touch, while waiting for the paint and lacquer to dry, I decided to polish the bolt carrier. It was more work than I though, but it adds a nice little extra effect on the gun.


I was first planning on using the regular AK-47 muzzle device on the gun, but it did not look right, somehow, so I opted for an extended bird cage style. The colour is not the same as the rest of the gun, but I actually like it better this way.


The rear sling mount works very nicely for a gun this size and can easily take either a modern hook system or a more classical AK style sling.


Since the gun now shoots about 20 rps, it's good that I have some spare magazines.


I have to say, I'm damn happy with the results I got from this. Altogether I think this project took up around 15 hours to finish over the course of four days.


I'd love to hear your thoughts and opinions on this project as well as read about your own custom builds! Until next time, folks!

Friday, 19 June 2015

Fixer-upper Part 2: TM AK-47

So, it didn't exactly take long for me to buy another malfunctioning second hand gun with dreams of nursing it back to health.

Patient: Tokyo Marui AK-47
Symptoms: Without trigger pull, begins firing as soon as selector is moved off from safe


This time I got myself a classic, an authentic TM AK-47. This was now the second gun I've been sold as having a metal body when that was, in fact, not the case. This one was sold as a TM, and I purposely asked the seller (who was in another town) to make sure if the body was metal. I knew Maruis typically aren't, but I was prepared to entertain the idea that it would have had its body swapped. The owner seemed a bit less knowledgeable, but as the price was quite low, I took the chance. When it arrived, though, plastic it was.

The non-metallic body issues were quite nicely alleviated, however, by the fact that out of the four metal "hi-cap magazines" that accompanied the gun, only one was actually a rattling BB bottle, and the other three were proper Marui regular size mags (holding around 70 BBs). I had prepared to resell the useless mags and get proper ones at a later point, but now there was no need.


All the original wood imitation externals and the bolt carrier had been painted black (poorly) and the paint on most of the magazines had worn down quite nicely. This immediately sent my mind on a trip to a post apocalyptic setting or a STALKER themed game. That is actually the look I'll be going for with this thing, more on that in another post later.

Day 1

The gun came with the large Tamiya connector, but with no batteries, as I purposely did not want to have the previous owner's NiMHs lying around, since I've moved on to using LiPos rather exclusively. All the batteries that I had, though, naturally had the mini Tamiya connectors, so I could not test fire the gun at all.

Since I had been toying with the idea of changing all my guns and batteries to Deans connectors anyway, this seemed like the perfect time to take my first steps in that direction.


The old connector came loose pretty nicely by just pulling on it with pliers, which saved me the trouble of having to strip the wires. After that, it was just a case of soldering the new connector on.


The helping hands are a life saver when you need to solder stuff onto other stuff, and I quickly had the connector on. Next was the battery. I decided to use an old, low power NiMH battery as a test bed, so as to not mess up a more expensive and much more useful LiPo. All went well, though (which, considering this blog, is rather unusual). Pretty much the only two things I could have screwed up, though, apart from forgetting the shrink wrap, were to either solder the connector pins on the wrong way, or worse, cut both battery wires at the same time, shorting the battery with the cutters in the process. I hear the latter especially is possibly a Bad Thing™.


Since I luckily managed to avoid both of the above, I now finally had some juice to fire up the AK for the first time. I turned the selector down from safe, and sure enough the thing started shooting right away. Something was obviously pretty wrong on the inside.

I unplugged the battery and began educating myself on how to open up the gun so I could get to the internals and figure out what was going on. Turns out it's not too hard to do, but I managed to break something in the process. I didn't unscrew the hop up adjustment tab, which when I tried to get the cover off, bent finally and broke the plastic piece of the cover that has the graduated sticker on it. No real problem, though, it's not really a functional part.


As I continued taking the gun apart, it became apparent that the/a previous owner had painted the gun with all the parts still on, as is evident from the image above showing the part of the body that was under the fire selector. The gas tube inside the front handguard also had some interesting splatter pattern going on.

Once I got the gearbox out of the gun, it began looking as though the gun had never been taken apart even once.


The dirt and grime in the picture above continued on the inside as well. What isn't shown here is the fact that the GB shell was held together with Torx head screws, not the usual Phillips ones. Guess that might have deterred a less enthusiastic mechanic, but not this one.


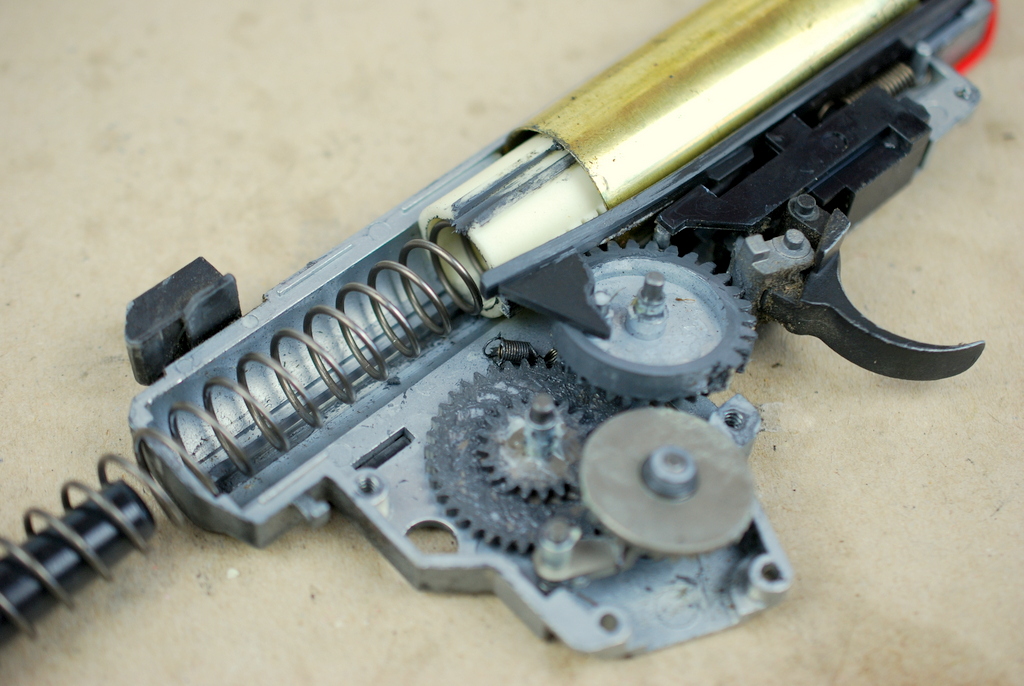
As I separated the gearbox shell halves, it was pretty clear something was in the wrong place. How the spring (between the spur gear and the end of the piston above) had managed to stay out of the gears so far was definitely beyond me, but I was certainly happy that it had.


A pretty clear picture of what was (most) wrong with the gun had now formed. The trigger switch return spring had broken just from the end where it's hooked on the post of the GB shell. Before figuring out what to do with it, though, I went through the other parts in case they needed cleaning or replacing.


The head of the piston was covered in a grimy, oily residue which had bits of dirt stuck on it all around. It was almost as if I was looking at an AK that had been subjected to a real steel torture test.


The extremely dirty piston had naturally also ground away at the cylinder wall, which was full of scratches and this one weird, large, deep scratch.


The light alloy sector gear (pictured from the flip side above) had its last tooth worn down cleanly, apart from a small flange that had been left behind. One more for the pages of the upcoming international bestseller Never Seen That One Before. The gun had basically short stroked itself somewhere along the way.


The dirty insides continued with the nozzle, the contents of which are seen above on the two ends of the Q-tip. I didn't dare even look inside the barrel at this point.


The trigger contacts had also certainly seen better days. The pitting is pretty extensive in my opinion. I took a small file to the metal it and filed it back down to a smooth surface on both sides.


I soaked all the metal parts in brake cleaner to get the old grease and dirt off. All of that residue is seen above. I was sure the gun would work a bit better without all that inside. Or was this in fact the mystical Marui magic dust without which the gun was ruined? Only time would tell.


As mentioned above, the trigger switch return spring had broken completely. It did look like it had also been between the gears at some point, as is evident from the bending above. Since I didn't have a replacement spring, my first thought was to see if I could re-use use this spring somehow.


I took two pairs of small pliers and bent the broken spring somewhat, so that the shape again resembled that of the original.


After a bit of fitting and cursing, my fancy makeshift repairs seemed to certainly do the trick! The switch was sliding back and forth just the way it should.

Since I hadn't located any other problems on the gun, I came to the conclusion that the always-on trigger was the only culprit, and began putting the gun back together, because I wanted to test fire it now with all the parts functioning.

Everything went pretty smoothly there, I re-greased everything and quickly tested the compression, which turned out to be surprisingly good, apart from the nozzle which had no o-ring.

Once I had the gun in one piece again, I set up the chronograph to see what kinds of results I would get.

With an 0.20g BB, the chrono read around 80 m/s (262 FPS), and with a 0.25g, 70 m/s (230 FPS), so around 0.6 J. It was obviously rather underpowered even by Marui standards, but this was to be expected with the self-short-stroking sector gear, the leaky nozzle, and what must be the original hop-up bucking. Since I had no replacement parts, I set the gun aside until I found some, particularly a new sector gear and spring.

Day 2

As luck would have it, I got some very slightly used second hand standard XYT steel gears and a new plastic piston and piston head for pretty cheap, and a completely unused second hand Vanaras green spring, which corresponds to an M110. I also happened upon a bundle of three more Marui metal regular capacity magazines, which brought my total to six. Those should certainly last a while for sure.

This time when I took the gun apart to install the parts, I also took care to unscrew the hop-up adjustment nub. It made removing the cover a whole lot easier.

Since the gun had originally also come with plastic bushings, I ventured to change those. As luck would have it, I had a set of 6mm ball bearings lying around from when I began working on the AUG and had mistakenly ordered the wrong size. It's good I have a hard time getting rid of stuff.

With the new(ish) parts in hand, I set to work. I decided to re-shim the gearbox as well while I was at it. 

After everything was set and the GB was back together, I noticed the motor had some trouble turning the stronger spring. At first I thought this might have something to do with the plainly sucky NiMH battery I was using so, encouraged by my success with earlier soldering, I decided to put a Deans connector on a stick LiPo as well.

Even with a fully charged LiPo the motor would occasionally not cycle all the way on semi-auto. Again my scavenging nature came in handy, however, as I still had the original motor from the AUG. 

Changing the motor (naturally) brought on a new, interesting problem. Since I had shimmed the gun using the Marui motor, and the AUG motor was just slightly different spec, the pinion gear now connected much too tightly with the bevel. Furthermore, the AUG motor sat ever so slightly higher than the Marui original that even turning the motor height adjustment screw all the way down was not enough.

Rather than reopen and re-shim the whole gearbox for a second time, I opted for another solution. I took the motor out of the cage, and screwed off the adjustment set screw. 


The screw head was a raised one, so I took out my trusty file set again and went to work.


After some ecstatic rubbing, I had managed to make the tip disappear. With the new flat headed adjustment screw, the motor was able to sit low enough to mesh with the gears very nicely, and I finally got the GB to cycle with the LiPo. And it did it ever so nicely. After a bit of height adjustment, the sound of the GB cycling also became very smooth, which I was definitely happy about.

The gun had originally been wired to the rear, but I didn't like the hollow sound of the stock or the fact the battery was bouncing around in it, and thus made one final move, to rewire the gun to the front. This would also allow me to use the same stick LiPo I had bought for the MP5.

After some cutting and soldering, and some more soldering, and finding a new place for the fuse, I finally had everything back in working order. Then I naturally had to chrono the gun again to see the fruits of my labour.

I was slightly disappointed to see that I was "only" getting around 92m/s (302 FPS) on a 0.25g, which is about 1.06 J, but at least the figures were on an incredibly small spread. I had a few times when two consecutive shots both read the same exact speed down to the tenth of a second. 

Despite the test results, I declared this leg of the project done at this point. After all, the gun was now fixed and was performing a whole lot better than it had when it arrived. It was ready to be taken out to the field at the first sight of opportunity. Later on, I will definitely still check and most likely change the hop-up bucking and the nozzle, which should both increase compression and will most likely get the gun to the expected power range of around 1.2 J, or around 100m/s on a 0.25g. 

In a later post I will also get back to the visual modifications I have in store to properly post-apocalyze this gun and the magazines for end-of-the-world scenarios.