Showing posts with label AUG. Show all posts

Friday, 23 January 2015

Stay Frosty

It's winter and it's cold. Well, more or less. Seems the temperature around here goes through a cycle of around 20 degrees, from freezing to few degrees above zero. So any given day it's either the fear of frostbite or slipping into a puddle.

A while ago we had a game in what was closer to the former temperature. Not only was it cold, but also windy. Not exactly ideal. Our typical weekend skirmishes would last for several hours, but this one was over after just two sessions. No one was really enjoying the weather and, more importantly, our guns started sounding rather unhealthy.
Some authentic Finnish snow right there

I had both of my AEGs with me as I wanted to see how the AUG would finally perform in the field. The G36C was there as backup in case something went wrong, but I actually ended up lending it to a team mate. He had had a malfunction in his primary some time ago and had nothing to play with, so a third team mate had brought a second gun with him to lend. That thing then refused to work at all. It just would not fire, not a single shot no matter how many different batteries we tried. Good thing I had one to spare. From what he said later, the G36C functioned perfectly all the way through. Not so with the AUG. Not even close.

I was using 0.25g bio BBs by G&G, which I've heard good things about, and should have performed very nicely. I shot some very nice groups with them in my apartment earlier.

Discounting the one outlier, a pretty nice grouping at 15 metres
While obviously not perfect, I was still expecting some rather consistent performance. I'm guessing the cold and my rubber G-hop did not work well together at all, since I was either lacking range, getting ridiculous amounts of over hop or under hop, or getting sideways spin, all without ever touching the adjustment wheel.

Towards the end of the second skirmish session, I was unable to hit the enemy at five metres because the scope had fogged over and so I had no clue where my BBs were going. I simply walked upright toward him, shooting from the hip. His gun didn't perform too well either, but he finally hit me at around three metres, which I only barely felt. It would have been more effective to just throw fistfuls of BBs at each other. At that point I also decided that I'd play no more, because the gearbox started sounding really unhealthy. I'm guessing the grease inside began to harden in the frost and the action seemed way slower. Needless to say, all of that made the first field test of my "finished" DMR pretty much a complete nightmare.

Slightly less than ideal aiming conditions
In all honesty, I now understand how people can get tired with their project guns. I've spent quite a few hours on the AUG so far, and it's still not doing what I want. But I will not be denied! I will have my DMR. Right now I'm thinking an IR-hop might be the answer to get me where I want, and even allow for winter games if I find a grease that works in the cold as well. It might be a while before I get the materials and the requisite interest, but it will happen. If not this winter then the one after.


Friday, 9 January 2015

Of Triggers and Nozzles

I decided to finally grab the bull by the horns and get back to work on the AUG. I had a new air nozzle and wanted to get the gun back in working order for the weekend game.

The newest nozzle I bought is by Core, and it's somewhat different from both the stock piece as well as the SHS aluminium one I had installed before. The stock nozzle has no o-rings, so it's bound to leak quite a bit of air. The SHS nozzle has one o-ring, and is made from aluminium. Both of them have a step in their profile around halfway through, the purpose of which is unclear to me. The Core nozzle has a smooth profile, and uses a double o-ring system which catches grease between the two in order to remain well lubricated. What surprised me, though, was that the o-rings did not come preinstalled, but instead sat on their own in the package.


The nozzle also had some surprisingly bad burrs on both ends, but they were quickly dispatched with a round file and crafting knife.


Out of curiosity, I decided to measure the length of the three nozzles, and was rather surprised by the result.

Left to right: Stock JG nozzle, SHS nozzle, Core nozzle

The SHS nozzle is a good bit shorter than the stock or the Core one. I'm not surprised that I wasn't getting all the power I was expecting. Why, however, would they make the nozzle so out of spec compared to the stock one? The mind boggles. At least I'm better off now. I hope to be, at least.

I had dreaded opening the gearbox for a while because of the way the trigger mechanism is built. It is pretty nightmarish to put together, as I've explained in earlier posts.


The main trigger piece (on the left) has a metal contact plate on the rear face that connects two contacts on the gearbox body to enable full auto fire. That is covered here with duct tape to make the AUG semi-only. The separate claw-shaped piece (in the middle) actuates the normal V3 gearbox contacts which achieves the semi-auto fire using a cut-off lever. The return spring, rather unsurprisingly, returns the trigger to the forward position.


When assembled, the two metal pieces are only connected to each other by the tabs on the larger piece riding inside the cutout of the smaller piece. Said cutout is open on both ends, so there's precious little to stop the smaller piece from simply falling off when reassembling the gearbox. To alleviate this, I came up with a plan.


Using an empty beer can as material, I created a piece that would hold the two trigger parts together and allow me to use my limited number of hands for more pressing matters when putting the box back together.


The sides of the can are really thin, so I reasoned they would not interfere with the trigger's movement.


After I had a good sized piece cut off, I used a sharp punch to mark the locations of the holes on the shell, and later a larger one to cut out holes to match the trigger pieces.


With my brand new Keep-It-Together-Plate™, I was ready to once again organize my fingers like some meat origami so that every piece would stay put until I got at least one screw in place.


I suppose it was too much to ask. But hey, at least the two pieces stuck together! One more go, and I had it.


First screw was in, holding the spring in check, and all that I had to do now was to move the gears around enough to be able to get the top part of the shell to sit in place. It helps to push the nozzle in, as that moves the tappet plate back and in so doing, takes the pressure off the gears.

Once everything was in place, I quickly connected a battery to check everything works, and then stuck the box back into the gun. Everything works as it should, so here's one success for the history books.

Tuesday, 30 December 2014

Less Scope Is More

Having never even fielded it, I came to the conclusion that the scope I had on the AUG was just overkill, plain and simple. 3-9X zoom and over 30 cm of length was too much for what is simply a DMR, not a dedicated sniper rifle. So I shopped around for a smaller one.

The old scope setup, for reference

Quite soon I found a short scope with the specs 4X32. The ocular is a bit smaller which possibly isn't ideal, but the whole thing is about half the length, which is great for handling.

Here we go, looking better already

The new scope came with high scope rings, and I after mounting I noticed that they were too high to use effectively. Luckily the larger scope originally came with lower rings, and since they have the same diameter, I went back to the allen wrench.

Better still

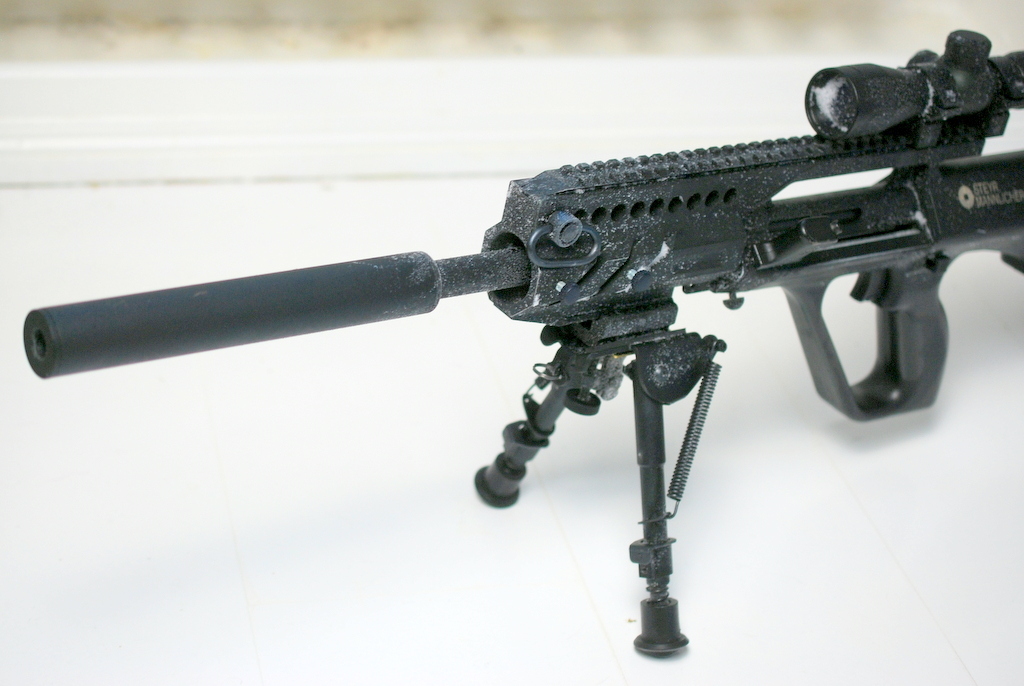
Today I also got word that the one part I'm still missing, and had already ordered and paid for, isn't available even from the manufacturer. So the wait continues. I though why not play around a bit while someone gets around to making that part, and so I slapped on the long suppressor I got for Christmas.

I'm definitely digging that look

The long suppressor does give it some more authority, even though it's simply a mock piece and does next to nothing. There's not even a longer inner barrel to hide. At least now it's noticeably longer than the G36C; there used to be only few centimetres of difference, which  I found rather amusing.

While digging around my toolbox, I also came across some interesting plastic-headed screws. I have no idea where they are from, but they fit the holes in the RIS assembly exactly, and since the holes are all the way through, I can use them to tighten the barrel into place. There are similar screws on the other side as well. Since I'm not using the rails that were there originally I thought I'd try something different. Maybe there's a bit of extra accuracy to be found there by eliminating some wobble.


Next up on my list, I got a new nozzle for this baby, this time made by Core. Unlike the SHS one in there now, it's completely smooth all the way through and seems to actually be longer than the SHS. I'm hoping that it'll fix the last of the compression issues I'm having. Stay tuned!

Wednesday, 24 December 2014

The Compulsory Gift Season Post

I got a load of airsoft stuff for Christmas, and I can hardly wait to put it all into use. I got all of these from my SO, which makes her pretty awesome in my book! I did give her a few (ok, a lot) of pointers on what to get, but who cares. I'm over 30 already, it's not like I'm expecting surprise gifts the way I was as a kid. I get what I like and she doesn't need to worry if she's bought the right thing. Everybody wins.

Anyway, here we go:


Pictured above are

  • GFC MOLLE leg panel
  • GFC PASGT replica helmet
  • GFC Hard knee pads
  • AE 30x200mm silencer
  • Bollé Tracker II goggles, smoke lens
  • FMA RIS Vertical Grip
  • GFC Three point sling
  • DBoys G36 collapsible stock
  • APS Bird Cage Flash Hider
  • VB Li-Po Battery 7.4V 2200mAh 20C


I have no real idea what to do with the helmet or the leg panel, but they look pretty cool. The helmet is very light and thin, so it's not exactly a realistic replica, but it looks good enough and I'm sure it will keep my head from bumping into hard things well enough. The leg panel hangs from a belt and wraps around your upper leg with a band just like a drop leg holster. I have no clue what the bungee cord is for, though. You can basically slap anything with Molle straps on there. One possibility could be to use it as a very light loadout base, so a few mag pouches and a utility pouch might be good. We'll see.

The knee pads with the hard outer shell will definitely be an upgrade when compared to the soft ones I currently have. The soft ones are light to wear and easy to use, but rocky ground, for example, feels a bit nasty through the fabric.

The stock and the grip are going on the G36C. As I mentioned in an earlier post, the default stock is rather low so you don't really get a good sight picture with a cheek weld. The raised cheek piece on the new one should help with that. I also like the fact that this one is extensible so I can alter the ergonomics. The current front grip also feels too thin and long, so I'm hoping this shorter and stockier one will be a big improvement. A separate post concerning their installation is forthcoming so we can get back to the actual tech side of things.

The Li-Po will be going into the AUG to make sure the motor gets enough amperage. The silencer is also going on the AUG, once I get one more piece that I'm still waiting for.

I have been so happy with my clear Bollé goggles that I thought a pair with darker lenses would be amazing for those brighter days. Plus they look way cooler than the clear ones which is, naturally, the most important thing when you're out in the field.

The flash hider? I don't really know what to do with that, but it was cheap so I thought I'd get it anyway. I might slap that on the G36C as well just to alter the look a bit.

There were a few more things that I got but didn't take a photo of. There's a load of G&G bio pellets, a medical and an admin pouch for my vest and last but not least, an M4 magazine adapter for the G36C. That rifle will be the most specialest little gun soon, just you wait.

I'm off to play with my new toys now. I wish you happy holidays as well!

Saturday, 20 December 2014

ASG/JG AUG A3 disassembly

The following describes the disassembly of the ASG AUG A3 automatic electric airsoft gun. The ASG AUG is a Jing Gong manufactured rebrand, so this guide holds true for the JG AUG RIS as well. Should be useful for other AUG models as well, excepting the parts referring to the rail assembly.

You will need the following tools:
  • allen wrench, 3 mm
  • allen wrench, 2 mm
  • flat-headed screwdriver
  • small phillips-head screwdriver

Disassembly

Begin by removing the magazine and battery if present.

Press the button on the side of the buttstock assembly halfway down. You will notice when the two halves of the gun become separated. Be careful when pushing the button, as it can exit the gun's frame completely if you push it far enough. It can be put back with some effort, but it's much easier to avoid the hassle altogether.


Slide the front assembly and the buttstock apart and place the buttstock half aside.


Unscrew the two allen screws on top of the rail and place them aside.


Flip the front assembly around, and you will see a hole in the rail with a set screw inside. Unscrew it about halfway to release the rail assembly.


The rail assembly should now slide free of the gun. If it is a tight fit, you can place a flat-headed screwdriver in the slot between the barrel and the rail assembly. Wrap the head with masking tape if you are worried you might scratch the metal surface.


Slide the rail assembly off and place aside. As you can see, I did not unscrew the rail assembly set screw out when I took the gun apart, so I scratched the underside of the barrel housing. Luckily it is only a cosmetic fault that will not show when the gun is assembled.


Unscrew the set screw in the barrel housing to remove the front outer barrel.


The barrel is no free to slide out, revealing the inner barrel sleeve (aluminium) and the inner barrel (brass). I've added masking tape on the sleeve to make it fit more snugly, thus reducing vibration.


There is a small tab on the decorative gas selector which can fall out and be misplaced. I have yet to find a real purpose for it, as it has no effect on the function of the gun, but I've chosen to keep it in.


Pull back the charging handle and lock it in the groove on the frame.


Twist the knob and rotate the barrel housing anticlockwise. The barrel housing is now free to slide out of the frame.


Slide out the barrel assembly and place the frame aside.


Unscrew the screws on the top and bottom of the barrel housing to release the barrel.


Slide the barrel out of the housing and place the housing aside.


While holding the hop-up unit and the barrel together, unscrew the two screws on either side of the hop up unit. The hop-up unit is spring-loaded and will jump out a bit if you don't hold on to it.


Slide the outer barrel and the barrel sleeve off and place aside.


This concludes the major disassembly of the ASG AUG A3. The hop-up unit disassembly is described in a separate post.

Tuesday, 9 December 2014

It's Alive!

The new motor arrived today. It's an SHS High Torque and it is great. I also got a new SHS polycarbonate piston so I would not need to use the aluminium one which gave me so much trouble already.

I wasted no time in installing the new motor, even though it took me a while to figure out how exactly the motor cage is opened. Before that, however, the wires had to come off.

I began by taking a picture of the wires connecting to the motor so that I'd know which wire goes to which terminal when I was putting them back on the new motor. I then soldered the wires off (again there was the mystical Chinese nuclear waste solder which took forever to melt).

Now I know what goes where

The next step was to unscrew the screws holding the cage together. The cage was still held together by an L-shaped bracket on the side. The motor has a spring on the top which forces the motor towards the bottom of the motor cage but also holds the cage parts from separating. After a bit of fiddling, I figured out how to pull the the cage parts in different directions so as to disengage the two pieces.

There is a small metal plate on the bottom of the motor cage which connects with the motor base to raise or lower the motor height according to how the height adjustment screw on the bottom is turned. The plate naturally flew away as the cage parts separated and I lifted out the old motor. It took a bit of time to actually find the plate from the floor since it (naturally) rolled away as if running for its life.

Putting the motor plate back in, I took the new motor and started fitting it into the cage. It was pretty intuitive how to now reattach the cage pieces, but the motor spring didn't want to co-operate and jumped out of its place a couple of times. After a while it was over and the motor sat where it should and the screw was back on.

Then I simply soldered the wires onto their new terminals. The motor terminals on the SHS High Torque are nicely marked with a + and - and the positive terminal is also coloured red, which is a very nice addition. Then it was time to work on the gearbox itself.

Since I had a new motor in, and also because my previous attempt was obviously not up to spec, I decided to re-shim the whole gearbox. Shimming is time consuming, but really only takes patience. I first took out all the gears and shimmed each one separately to see how many shims I needed on each gear. Then I shimmed starting from the bevel gear and moved shims from top to bottom or vice versa depending on which way the gear should be moved. Then the spur gear followed, adjusted based on the bevel, and finally the sector adjusted based on the spur. It was all pretty intuitive once I knew what I was doing.

The new piston fit in without a problem, and the only issue I had was (again) the trigger pieces. I cannot for the life of me figure out why they are made the way they are. If they just were somehow connected, it would make it all so much easier. Perhaps I can in the future modify them to be somehow at least a bit more sensible. The annoyance of trying to get these small parts into place while a strong spring is trying to wrest the gearbox shell open and the gears are not quite fitting into their holes is just simply infuriating. I did finally get it all back together, though.

Since I still had the chronograph on loan, I set it up like last time, loaded up with 0.20g BBs and fired away. What a joy it was to see the AUG finally shooting so much better. I averaged 126 m/s (413 fps) across around 20 shots. Everything seems to work great, although I should maybe be getting a bit more power out of it still. Most likely the air nozzle is not mating properly with hop-up. But that's a small issue to fix compared to all of what I've done up until this point.

The AUG is mostly finished at this point, although I have some visual modification still in mind.

If there is one thing to learn from my trials and tribulations regarding this particular gun, it would be to upgrade as many parts in one go as you can. I've been working on this thing for over two months now and it has been incredibly frustrating to have to order one piece after another and then wait for them to arrive before I can get back to the project. Had I bought the air nozzle, cylinder, cylinder head, piston, piston head, spring, spring guide and motor all in one go, this whole project would have been done in a week or so. Instead I've done battle with it for so long and never managed to field it in all that time. I'm now definitely looking forward to taking this gun out and actually playing a proper game.

Wednesday, 3 December 2014

No More No Scope

Few days ago the scope and bipod I ordered a while back arrived. The scope came with scope rings, but they were much too low. As I mounted it on the AUG, I had to tilt my head sideways to be able to see through the scope. In no way was that ergonomic or natural. Today I bought new, higher scope rings and now it is perfect, the scope lines up with my eye instinctively.


I am loving the look of the AUG with the scope and bipod on


The bipod is a spring-loaded one with extending legs


The scope has variable (3-9X) magnification and a 40 mm eyepiece

The eye relief is around 7-8 centimetres
As soon as I get the new motor, I'm definitely putting the gearbox back together so I can finally start fielding this rifle alongside the G36C. It has been a long long project, but I think it will soon be finished.

Thursday, 13 November 2014

Teething Problems

Today the long-awaited steel spring guide arrived, so I got to open up the AUG gearbox. Again.

Some violence and swear words later (I only had to reopen the box once because the trigger return spring got out of its hole), I actually had, on the table, a real-life closed gearbox with an M135 spring, steel spring guide, aluminium piston and piston head, and an o-ring nozzle in there.

Now I would just need to see if the default motor was strong enough to wind the whole thing. Since the MOSFET setup didn't really work after attempts one and two, I've decided to look into it later, and thus soldered the wires back to their original places.

I plugged in the battery and hesitantly pulled the trigger: The motor gave a short whine, the piston moved maybe a centimetre backwards, and then everything fell silent. Pulling the trigger didn't do anything anymore.

After some troubleshooting I looked at the fuse and it was very obviously blown. At first I just thought that the motor had too little power to pull the heavier spring, but decided to open the gearbox (again) to see if something else is wrong. Maybe the piston was still getting stuck to the sides.

And it truly was, but not the way I thought. I had shimmed the gearbox a bit wrong. The sector gear was riding a bit too high, and the piston had a lip overhanging the rack. What happened was the sector gear dug into the piston and the fuse naturally blew once the tension got too high.

You can see the dents where the sector gear teeth have dug into the piston body

So now I'm going to need some new fuses. And I've just ordered a high torque motor, just to be sure. The gearbox shall now wait until I get everything, I just don't have the energy to start mucking about with the trigger right now.

Friday, 7 November 2014

Rebuilding a MOSFET

I already tried my hand at building a MOSFET for the AUG, but it didn't quite go to plan. Today I decided to retry. This time I didn't burn it up when building, so I put the gearbox back in the AUG and did some test shooting at home.

I got a whopping hundred-or-so shots out and then the MOSFET shorted again. Lovely. A full-auto AUG without any controls. Nothing left to do but disconnect the battery and throw everything back in the closet. One of these days it will work, damnit.

Saturday, 1 November 2014

Get a MOSFET They Said

I have come to the conclusion that getting a MOSFET for the AUG is a good idea. That should spare the trigger contacts and make for a crisper trigger response. Sounds like a pretty good deal to me. I know there are ready made MOSFETs around, but I'd rather save some money, get the parts myself and try my hand at building one.

Now, I will readily admit that I'm not an electronics wizard by any measure. However, I can follow guides quite well, and have built other stuff in the past with success. After finding a promising looking how-to, I bought the parts and started soldering.

I could only get resistors in packs of 50, but at least they cost next to nothing. I got more than one of the MOSFETs as well in case something should go wrong


The AUG gearbox is handy in that you don't need to take it apart to be able to put a MOSFET on, since the wires are soldered onto the outside. This is apparently done to achieve the two-stage trigger mechanism. This thread on airsoftforum.com pretty much describes the process of installing the MOSFET.

As I started desoldering the wires, I found it was not quite as easy as I thought. I have an adjustable power soldering iron, but even at full blast it took ages to make the solder on the gearbox melt, and as soon as the heat was taken off, it would set again. What is in that stuff I don't want to know. In the end I was however able to suck off all the solder and wire in the MOSFET.

I have to admit it took me a bit of time to actually make sense of the wiring diagram, since the positive and negative marked wires didn't seem to make any sense. I have the default, small Tamiya connectors on all my batteries, and I went to Wikipedia to see and make sure I got them the right way around. Ok, positive is the square terminal, negative the other. Would not want to have my motor turning the wrong way, definitely.

Comparing the diagram and the connector didn't seem to make any sense though. The fuse seemed to be on the wrong wire on the diagram. I started to feel like I'm just dumb for not figuring this out, until about fifteen minutes had gone by and I went on Wikipedia again and read a few lines further, where it says "In some cases, Mini-Tamiya connectors are wired in reverse polarity. This is often the case with airsoft guns, where the square profile terminal is the negative terminal and the rounded terminal is the positive terminal." Right. Great. Why? I don't know the reasoning behind this non-standard wiring but at least I'm wiser now. Time well spent.

With the wiring issue sorted, I finished up my soldering. I hooked up the battery to see if everything works, and with building anticipation pulled the trigger. Everything worked! Brilliant. I'm not dumb after all!

My elation was rather short-lived though, as I apparently managed to touch the MOSFET on the soldered wires, thus shorting it, and with a bit of smoke rising towards the roof, the MOSFET burned up internally so that the circuit was now eternally closed, and the gearbox was running on full auto regardless of whether the trigger was pulled at all. I guess it's a good thing I bought spares. I took off the battery, boxed up the pieces and went to bed.


Thursday, 30 October 2014

Springy Spring Is Springy

I've been waiting for a number of parts to arrive so I could get back into resolving the poor performance of the AUG. The cylinder is the biggest thing, but I also finally got the M135 spring and grease that was highly recommended for AEG internals (Team Associated Green Slime). Now that I had all the pieces, I opened up the gearbox. And of course there were some hiccups therein.

To start off, I unpacked the cylinder (an SHS brand steel one in case anyone is interested). I had read that polishing the inner surface is a good idea, and luckily I had some 0.3 micron lapping film left over from when I tried to sharpen my straight razor years ago. It worked pretty nicely and after a while I had a pretty nice shine going.

I then opened up the gearbox. This time I managed to keep the spring in check with a screwdriver and also remembered to release the tappet plate spring, so no parts flew out today. Again using the Scho-Ka-Kola tin, I collect all the small pieces so as not to lose anything.

A quite a while earlier I had already bought an aluminium piston and piston head which I thought would be great replacements for the originals. But as it turned out, I couldn't use them without a new spring, because the original spring has a twist on the end and as such was only compatible with the original piston assembly.

The original piston, piston head and spring taken apart. The front end of the spring has a twist which rides in the groove of the metal piece in the middle, which again has a raised section that aligns with the groove in the piston. 


Now that I had the new spring, so I could finally get to work. But it wasn't that easy, of course. As it turned out, the piston I had was not exactly round, but rather flattened on the end. It also had some strange pitting in places, so I slowly began to question its quality. Since the piston was not round, it wouldn't slide freely in the gearbox, instead getting stuck around halfway. At least I was smart enough to test it out before putting the whole box back together only to then wonder why it is not working.

Metal piston, 1, non-round


I started fixing the piston by simply sanding the sides, hoping this would give me enough clearance, as well as make the piston slide better due to added smoothness. It didn't really do the trick, though. It was still getting stuck on the sides when the gearbox was kept closed by simple finger pressure alone. Something else had to happen, clearly. I reasoned that I could reshape the piston with some pipe pliers once they're set to proper size. It turned out to actually work, as I slowly progressed from the end towards the head, carefully pressing down from several angles.

Sanded and reshaped with pliers


The piston was now at least round enough to move freely. Attaching the piston head was a rather simple feat involving a screwdriver and some finesse. The piston head sat a bit crooked on the piston, though, so I had to take it back off again. The crookedness was alleviated by adding a thin metal washer behind it.

Next, finally, came the spring. I was most eager to finally get a proper spring in so I could really start making the AUG into a DMR (and being able to bring it back into games as well). I soon found the error in my thinking, though.

The default spring guide in the AUG is a plastic one. It's sturdy enough to hold the default spring in check, but the new, stiffer one was much too much for it to handle. As soon as I managed to stuff the new spring in and ever so slightly let go of it, the natural tendency of the spring to extend did the spring guide in. The only thing holding the spring in place was a small plastic tab on the rear of the spring guide, which was mated with a hole on the gearbox shell. As you might have guessed, it was no match for the spring at all. So out popped the spring and off popped the tab. Determined to get this thing together today, I picked up the gears that had flown out, placed them back in, and retried the whole operation. I turned the spring guide around to use the other tab that was still in place, but very soon got the exact same result. So now I was left with a spring guide with no tabs on, and a spring that I could not keep in place long enough to actually put the gearbox back together.

The sorry excuse for a spring guide. You can clearly see where the tab used to be on this side


I just had to admit defeat and put the old spring and piston back in, again. At least the new cylinder was in so there was at least some improvement over from where I started. The trigger pieces made me want to pull my hair out, again, because it took several tries to actually get them to sit still long enough to line up the gearbox shell and all the pieces inside. If the gears were properly aligned, the trigger pieces weren't and vice versa.

I finally got it back to working order, though, and sighed in relief. This thing is starting to drive me nuts, seriously. A steel spring guide is on order, so I'll get back on this once it arrives.