Showing posts with label shopping. Show all posts

Wednesday, 4 October 2017

Steely Slide Stopping Success

Is it wrong to be this exctited about a fairly small piece of technical innovation? If it is, I don't want to be right.

Around a year ago, I bought a second hand, run down KJW KP-08 with the hopes of fixing it. The four CO2 magazines that came with it had leaky valves, but most other things seemed to be in ok-ish working order. I put the gun and mags in a box and stored them for later. Once I now finally got around to replacing the valves and testing the magazines, I was faced with a new problem.

The old, original slide stop was so worn down that it would not stay put in the gun when shooting, and eventually decided to attempt evacuation at the most inopportune moment. The result (as best I can deduce and reconstruct the events) was that the slide slamming backwards hit the stop, and broke it in two.

At first I thought of just getting an original replacement part, but I've had my fill of pot metal parts lately, and decided to shop around a bit. That's when I came across this KF Airsoft steel slide stop for the Hi-Capa. I thought it brilliant, as I would not have to worry about it breaking again. Once it arrived, though, I was pleasantly surprised even further.


In addition to the stronger-than-original build material, the take-down pin is not a single piece, but a sleeved structure. What this allows is for the weight and force of the slide to rest on the sleeve, leaving the actual slide stop lever to rotate freely inside. In other words, you can have the take-down pin as tight as you want without it affecting how the stop itself functions. This is simply brilliant. I don't know who originally designed this, but it's damn marvelous!

As with all things airsoft, though, some modification was necessary.


As seen in the above image, there's a metal nub protruding from the inside of the stop, which would hit the feed lips and the side of the magazine, preventing proper seating and functioning. So, what else was there to do but break out the file set and get to work?


I filed down a bit, tested the fit and worked until nothing pushed against the magazine.


As a result, I ended up taking down the protruding nub entirely and shaving the backside of the retaining tab as well in order to secure proper fit.


I reassembled the gun and had a test fire. I'm now getting a very positive lock with this part. It's better, in fact, than the original one, and it cost just a few coins more than an OEM part!

It's (sadly) not everyday that you come across airsoft parts that surprise you this way. I'm pretty stoked this one did! If you have any similar experiences, please do share them below!

Saturday, 2 May 2015

Hi Maintenance

I recently bought myself another gas blowback pistol. It's not like I actually needed one, but I saw this one on a local airsoft marketplace on Facebook and just decided to have it.


There she is, a WE Hi Capa 5.1. The picture is after I did some work on her, all of which is detailed below. But first, some background.

I've never really been into 1911s, I know some people swear by them both in the real steel world as well as in airsoft. Personally, the Hi Capa looks visually a lot more pleasing than the original 1911 design. Especially the models like this one with the sharp angle on the trigger guard. Interesting how such a small thing can make a big difference. Still, I wasn't really in the market for a new pistol, but when this particular one floated by me in the marketplace, something about it caught my eye. Since the price for the gun and one functioning magazine fit my wallet nicely, I decided to go for it.

The seller was from another city, but he was kind enough to send me extra photos of the externals. A few scratches, nothing major. He did say that it had been used for couple of years, but that it worked ok, and that the right hand safety was a bit loose but didn't really affect use. I didn't enquire any further, and we agreed on the deal. He mailed me the gun the very same day, which I was very happy for. Caveat emptor, though, it seems. While the gun did function, yes, and the safety was loose, sure, what I wasn't told was that there were a few more shortcomings.

After receiving the gun I naturally filled the magazine with gas and fired off about twenty or so BBs. Every round cycled and the gun had a very nice kick to it. One of the first thing I noticed handling the gun, though, was the way it rattled. Several parts seemed to have rather large clearances. I couldn't tell if this was by design or from wear.


Just gently twisting the slide from side to side produced a rather noticeable gap between the frame and slide. Another thing I noticed was that the slide stop was incredibly loose. The pin would move from side to side several millimetres just by turning the gun sideways.


It was obvious the gun had seen better days, and as I test fired it some more, I came to notice that the the slide stop barely functioned. The slide would lock back about one time out of three or so on an empty magazine.


When it did work, the slide stop only barely caught the edge of the cutout, and the wobble of the frame allowed it to slip out rather easily. There was also some gooey residue on the slide stop and frame, which I assume is from some haphazard tape related attempt at fixing the slide stop on the previous owner's part.

The safeties didn't fare too well either. The grip safety was completely non-functional, so you could discharge the weapon without depressing it at all. The thumb safety had no resistance to it, and would at times engage by mistake.


As the seller had mentioned, the right hand side thumb safety was extremely loose, and it did indeed have several millimetres of upward travel before the left side safety would move at all.

The obvious next move was to take the gun apart. I had to go online to see how that is done on a 1911. If you're curious regarding that as well, it's done by moving the slide back enough so that the smaller cutout (see image above) on the slide meets with the tallest part of the slide stop. At that point a small tab on the inside of the slide stop is no longer stopped by the slide. When I did this on my pistol, the slide stop would simply fall out if the gun was held sideways. With the slide stop out, the slide is free to move forward and be removed.

Not being familiar with 1911s, I didn't even realize everything that was wrong at this point. If you know your 1911s, you might have already figured out a couple more things which I didn't know of.


Looking at the slide stop and the cutout on the slide in detail, it was obvious they had severely worn down and created a slanted contact surface, so that the force of the recoil spring slamming the slide forward would push the slide stop out and down, and it would simply slip off the edge of the cutout. It certainly didn't help that the slide stop was so incredibly loose.

I figured that it had simply worn down as everything else seemed to have on this gun. I decided to fix this with a bit of super glue and material from a beer can, so that the pin on the stop would have a tighter fit and the end of the stop would ever so slightly turn inwards, towards the gun.


I started off with some brake cleaner to get rid of all lubricants and other contaminants both on the pin and the strips of can I'd cut into size. Then I pre-twisted the can strips around a small screwdriver so that they'd hug the surface better (after I'd taken this photo where the upper strip doesn't attach properly). A toothpick was a very handy tool when applying the glue onto the pin, and a pair of tweezers helped get the strips in place. This was the first, but nowhere near the last time when my scale modelling experience and tools came in handy with this particular gun.

Once the glue had set, I filed the edges of the can strips down so that they were flush with the pin surface. The side wall of the can was only 0.10 millimetres thick (I callipered it, that's just who I am), but we are talking very small clearances here. After that it was mostly just testing, filing, testing, filing, testing and filing some more, until I found the perfect fit. It couldn't be too snug, or the magazine follower would not move it, and not too loose, or it would not sit properly in place.


Speaking of magazine followers, I thought to aid things further by stretching out the follower spring, thus giving some extra oomph to the follower and achieving a more positive lock on the slide. As things stood at this point, the magazine follower would not even lift the slide stop up all the way.

Taking the follower and spring out was rather easy. You just need to push out and then pull off the pin near the top, take off the feed ramp, and make sure to hold onto the follower, lest it fly off with the spring. Once out, it's rather straightforward just to stretch the spring a bit an put it back in. I, however, decided to go one further.


A bit more superglue and can bits were in order. I cut off a very thin strip and, with some tweezers, bent it over itself a couple of times to produce an extension to the magazine follower. With the strip bent, I cut the extra bit off and attached the extension into place with a rather hefty load of glue.


After this, I put the magazine together to see how things had improved. As an afterthought hours later I realized I should have put the strip on sideways and used the extra bit of the strip to attach it to the side of the follower for an even more secure fit. Then again, this is not exactly a part that's under high tension.


Even after this fairly remarkable improvement, the slide still would not lock back every single time I racked it with an empty magazine in the gun. I thought now would be a perfect time for some metalworking.

As I'd mentioned before, both the slide stop and the cutout on the slide had worn down rather lot. I figured straightening out the slant on both would not only ensure the slide stop didn't want to get pushed outwards any more, but that there would be even more space for the stop to jump up because of the increased clearances.


I taped off the slide a bit to make sure I didn't scratch it with the rotary tool I used (after I'd scratched it the first time, of course). A small grinding head, steady hands, and a lot of patience, and I finally managed to remove the slant from the slide and change the angle of the end of the cutout to also be a bit more vertical. Then, with a small hand file, I evened out the end of the slide stop to remove the slant from it as well and make it fit the cutout.


I think I made a pretty good job at mating the surfaces. The slide stop issue was now mostly resolved. It would still occasionally, when inserting a magazine, pop outwards a bit, so that the follower was no longer touching it. I decided to move onto the thumb safety, however.

With the slide off the frame, the safety lever would rise up a bit higher, and I could then just pull the two pieces apart. The safety levers were linked by a triangular head and slot, and the wobbling was due to the pieces having worn down. As before, I reached for the beer can, cut off a strip and set off to glue my fingers to the workpiece.


With the strip in place it was again time to simply file it down until the fit was snug. When I was happy with the fit on the outside of the gun, I went to reinstall it. And that's when a strange, small, oblong piece fell out. Luckily I noticed where it came, a small opening parallel to the frame above the grip.

After some head scratching and online searches, I came to the conclusion that it is something called a slide stop plunger. The things that typically hang out with it, the spring and a thumb safety plunger, were nowhere to be seen. This was pretty much the moment the penny finally dropped.

The reason the slide stop and the safety were so loose was because they were supposed to be held in place by spring loaded pieces. I guess the safety plunger and spring had gone flying when the previous owner took the safety apart, with the slide stop plunger left in place. For a while I tried to think of something to scavenge a spring small enough from, but after opening a couple of pens and such, I came to the conclusion that I simply did not have a spring that small anywhere. Onto plan B, then. After all, I reasoned, it didn't have to be a spring, just springy enough.

Wire. I have loads of different sized wire lying around. It didn't take too long to find the proper size.


After I'd cut the wire to length (with some to spare), I pulled out the copper so I could use the jacketing as a spring. Since the plunger for the other end was missing, I had to improvise. With all the toothpicks I'd used and left lying around, it didn't take long, though.


The wire jacketing was just the right size to fit the end of the plunger and the head of the toothpick in firmly, and fit in the hole in the gun. It's not as good as a proper spring, but once installed, the thumb safety became very crisp and the slide stop would sit in place very tightly. Also, now my gun is partly made of wood, which makes it at least 213% more classy.


One negative side did come with the plungers installation, though. With the safety installed, the slide stop became very tight, since the plunger was pressing against it.


I went to my trusty file again, and smoothed out the end until it was pretty nicely polished and no longer made such heavy contact with the plunger. Some lube here and there, and I had a very positive lock on each and every racking on an empty magazine.

One final thing I just had to take care of, though. The rattling slide. Since I'd already spent so much time and effort, it would have felt stupid to leave the slide-frame connection so loose. Guess which materials I used?


Cut strips, clean with brake cleaner, apply super glue with toothpick, place with tweezers, hope it sticks. I put one strip on the side and one on top, so as to make the slide sit tighter both in the horizontal and vertical planes. Putting the top shim (that's what they basically are) on the bottom of the rail allowed me to seat the slide lower down, which would further help with the slide stop. After installing the shims, I again carefully filed the ends to make them sit more flush with the rail.

The Hi Capa frame has these short rails to connect the slide to the frame (unlike my P226, for example, where the rail is as long as the frame), one pair on top of the trigger, the other one just in front of the hammer. I put shims on the rear rails as well, but soon noticed it was not such a good idea. On the front rails the slide is in constant contact with the shims, but on the rear rails the contact is broken when the slide cycles. The thumb safety cutout got caught at least once on the rear shims when testing, so I removed the shims from the rear completely. The ones on the front seem to do the job very well, though.

After all this, I lubed up all the moving parts, put everything back together, removed the previous owner's gunk from the outside and tried it out.

It. Is. Sweeeeeeeet. Everything works, the gun no longer rattles, I get a slide lock every single time, and all in all it feels so much better than when I got it. It just might be that now that I've put so much love and sweat into this thing, the P226 will have to take a back seat.

One final pic from the mess of a work area that made this happen. I'm thinking of looking into the issue with the grip safety, but that is for another day.


Friday, 6 March 2015

New Arrivals

Hello again guys and gals! I know this blog has been as dead as a doornail for the past month or so, but it's about to change. The rapidly fluctuating weather and other business have seriously dug into my airsofting, so pretty much nothing has happened since the last update. I don't think I've even been to a weekend skirmish since the last post in January.

The spring, however, is not only in the gearbox but also around the corner (yes I know that's a horrible way to use these particular words), and thus I'm looking forward to reactivating in the BB shooty business. To help things along, I went and bought new stuff to play with. Yes, both in the field and on my workbench. I obviously have some pent-up punning in my system, sorry.

I have read so many praising words on reddit's airsoft sub about the Galaxy G.5 that when I saw it on sale, I just had to grab one for myself. It's a replica of the H&K MP5K PDW, and I just love it. I seem to have a thing for H&K guns, since I'm also drooling over the G3 and the HK416. When money decides to depart my wallet, you'll hear about it on this blog.

The Galaxy MP5 in question ended up offering more than I expected. The box not only contained the gun, hicap magazine, cleaning rod, charger and a battery as usual, but also some extras such as a second magazine, a speed loader and a carrying strap.

That's a lot of stuff for a gun that cost well under 100 euro 
In short, it seems like an ideal starter gun for someone wanting to get into the sport. For now, it seems and feels really great, especially for the price. I'll get more into the details and specifics in a future review post.

I couldn't obviously just get the gun, so I went all out by getting a bunch of extra MP5 mags (I never liked hicaps), mag pouches, a radio headset and PTT, some M4 magazines and a belt attachment for a Serpa holster I had bought for my P226 earlier.

MAG midcaps in the 90 round range. Got a great bulk offer for 8 mags and just had to take it.

Triple mag pouch attached to the leg panel I got for Christmas. Takes in 6 mags, staggered slightly here for easy access. I'm seeing in my mind a very light QCB loadout incorporating this for the coming summer.

Z-tac Bowman Elite II and Z-tac Peltor PTT. They work very nicely, although I had a short moment of panic before I realized I hadn't pressed the jack all the way into the PTT and thus wasn't hearing anything.

King Arms M4 midcaps (120 rd) with the Battleaxe mag well conversion kit I got for the G36C earlier. Will be writing about these a lot more once I install the kit and field the gun and magazines.
Last but not least, the non-brand belt attachment for a Serpa knockoff, here already attached to the authentic holster. I got the holster used, and it only came with the paddle attachment seen on the right. Hoping against hope, I bought the belt attachment simply based on the similar look of the holes, and luckily the copy job has been very accurate!

I think this is all for today. As I said, there's a lot more to come. I will be reviewing the MP5K in depth, doing the mag well conversion for the G36C, recounting my field experiences with it and the Z-tac headset and much much more! In the words of my spirit animal, Bender Bending Rodríguez: "I'm back, baby!"


Tuesday, 30 December 2014

Less Scope Is More

Having never even fielded it, I came to the conclusion that the scope I had on the AUG was just overkill, plain and simple. 3-9X zoom and over 30 cm of length was too much for what is simply a DMR, not a dedicated sniper rifle. So I shopped around for a smaller one.

The old scope setup, for reference

Quite soon I found a short scope with the specs 4X32. The ocular is a bit smaller which possibly isn't ideal, but the whole thing is about half the length, which is great for handling.

Here we go, looking better already

The new scope came with high scope rings, and I after mounting I noticed that they were too high to use effectively. Luckily the larger scope originally came with lower rings, and since they have the same diameter, I went back to the allen wrench.

Better still

Today I also got word that the one part I'm still missing, and had already ordered and paid for, isn't available even from the manufacturer. So the wait continues. I though why not play around a bit while someone gets around to making that part, and so I slapped on the long suppressor I got for Christmas.

I'm definitely digging that look

The long suppressor does give it some more authority, even though it's simply a mock piece and does next to nothing. There's not even a longer inner barrel to hide. At least now it's noticeably longer than the G36C; there used to be only few centimetres of difference, which  I found rather amusing.

While digging around my toolbox, I also came across some interesting plastic-headed screws. I have no idea where they are from, but they fit the holes in the RIS assembly exactly, and since the holes are all the way through, I can use them to tighten the barrel into place. There are similar screws on the other side as well. Since I'm not using the rails that were there originally I thought I'd try something different. Maybe there's a bit of extra accuracy to be found there by eliminating some wobble.


Next up on my list, I got a new nozzle for this baby, this time made by Core. Unlike the SHS one in there now, it's completely smooth all the way through and seems to actually be longer than the SHS. I'm hoping that it'll fix the last of the compression issues I'm having. Stay tuned!

Wednesday, 3 December 2014

No More No Scope

Few days ago the scope and bipod I ordered a while back arrived. The scope came with scope rings, but they were much too low. As I mounted it on the AUG, I had to tilt my head sideways to be able to see through the scope. In no way was that ergonomic or natural. Today I bought new, higher scope rings and now it is perfect, the scope lines up with my eye instinctively.


I am loving the look of the AUG with the scope and bipod on


The bipod is a spring-loaded one with extending legs


The scope has variable (3-9X) magnification and a 40 mm eyepiece

The eye relief is around 7-8 centimetres
As soon as I get the new motor, I'm definitely putting the gearbox back together so I can finally start fielding this rifle alongside the G36C. It has been a long long project, but I think it will soon be finished.

Friday, 28 November 2014

It's Almost Like The Part I Wanted

A couple of weeks ago I ordered some longer accessory rails for the G36C. I only would have needed one, because I was planning on putting it on the bottom of the handguard, but they would only sell packs of two, meant for the sides.

The default rail feels a bit short in my opinion, so with a longer rail I could have the foregrip a bit closer to my body.

Original grip placement on the default rail


Enthusiastically, I opened the bag of new rails, removed the foregrip and unscrewed the default rail. I began fitting the new rail only to notice it wasn't actually up to spec.

With the front screw hole aligned, the rear one doesn't come even close.


I'm sure you can imagine my disappointment at this point. I had waited for these things to arrive for more than two weeks, and even though they were sold as G36C accessories, they do not fit it. And no, the side rails do not have a different screw placement, so every rail should be able to sit anywhere. Not these things, though. 

After some searching I find the specs for the real steel G36C, and after comparing them to my airsoft gun, I see that the replica is well copied from the original, whereas the rails I got are simply not correctly made. A replacement would take forever to get here, so I just decide to fix this situation myself.

The front screw hole seems like the obvious place to work on this piece, since it's already an oval shape and there's only little material nor is there any actual rail in the way. 

With the rotary tool, I first try a grinding bit with similar dimensions as the hole, with the idea of simply grinding away enough material so that the screw would go through. The grinding tip is too fine, though, so this takes ages. 

I quickly get bored with the lack of progress, and switch over to a cutting bit. I can't use that one from the inside out, though, so the whole front of the hole has to go. The rotary tool is definitely great for this kind of work, since it's light and easy to manoeuvre around. With the cutting tip I can both cut and grind, so in a few minutes I have a nice, clean looking result.


I screw it on, but it's almost as if someone keeps going "Not so fast" all the damn time. Not only is the rail too short, it's also a too thin: Having screwed the rail and the front sling point on, I notice there's a bit of up and down wobble. So off come the screws again and I'm back at the planning stage.

Luckily, it doesn't take long to come up with a solution. I have it handily lying around, and it worked for the AUG, so why would it now work here? So duct tape, the sticky but ever-faithful hound of the handyman, to the rescue!

It sure is thicker now!

Stuffing this thing back into the sling mount isn't easy, but once done and the screws are tightened, it definitely doesn't budge.

I fiddle around a bit with the foregrip to find the perfect placement, and it indeed feels most ergonomic a few centimetres further back from where it used to be. It was all worth it, in the end!

Here we are. It's all better now!

Thursday, 13 November 2014

Teething Problems

Today the long-awaited steel spring guide arrived, so I got to open up the AUG gearbox. Again.

Some violence and swear words later (I only had to reopen the box once because the trigger return spring got out of its hole), I actually had, on the table, a real-life closed gearbox with an M135 spring, steel spring guide, aluminium piston and piston head, and an o-ring nozzle in there.

Now I would just need to see if the default motor was strong enough to wind the whole thing. Since the MOSFET setup didn't really work after attempts one and two, I've decided to look into it later, and thus soldered the wires back to their original places.

I plugged in the battery and hesitantly pulled the trigger: The motor gave a short whine, the piston moved maybe a centimetre backwards, and then everything fell silent. Pulling the trigger didn't do anything anymore.

After some troubleshooting I looked at the fuse and it was very obviously blown. At first I just thought that the motor had too little power to pull the heavier spring, but decided to open the gearbox (again) to see if something else is wrong. Maybe the piston was still getting stuck to the sides.

And it truly was, but not the way I thought. I had shimmed the gearbox a bit wrong. The sector gear was riding a bit too high, and the piston had a lip overhanging the rack. What happened was the sector gear dug into the piston and the fuse naturally blew once the tension got too high.

You can see the dents where the sector gear teeth have dug into the piston body

So now I'm going to need some new fuses. And I've just ordered a high torque motor, just to be sure. The gearbox shall now wait until I get everything, I just don't have the energy to start mucking about with the trigger right now.

Saturday, 18 October 2014

Hard To Port!

As I wrote just a few days ago, I opened (and reassembled) the AUG gearbox for the first time. I wish I'd left it disassembled, because I just found out that one further reason I'm getting such a sucky amount of power is that it has the wrong kind of cylinder for its barrel.

The air volume of the cylinder should match or exceed the volume of the inside of the barrel, as far as I've understood from reading things online. Since all (well, vast majority) cylinders are the same length, the way to reduce the effective volume is to cut a hole (or port) to the side of the cylinder so the air escapes until the piston passes that spot.

You can refer to this chart I found on the Airsoft Society forum if you're interested in the different types.

The AUG has a very long barrel, 509 mm. That is matched with a solid, i.e. non-ported cylinder. What has been used on the JG assembly line (I recently found out that ASG AUGs are JG manufactured rebrands), however, is a 3/4 ported one, which has a lot less volume, so the air pushing the BB along the barrel "runs out" before the BB has exited, resulting in loss of power.

I've ordered a new cylinder, so now I'm again patiently waiting for a delivery. And I will need to do battle with the gearbox again.

Friday, 10 October 2014

Silencer Painting

A while ago I ordered some bits and pieces from an online airsoft shop. Among them was a silencer I thought might look nice on the AUG. It wasn't quite what I expected, though. The shop picture and description said it is all black. It wasn't.

Seriously? The text is possibly one of the most childish things I've seen in a long while. Want to come across as a try-hard operator? We have just the thing for you.

As you might imagine, I wasn't too happy with what I got, and it got even worse. I wrote a polite complaint email to the shop, only to be told that "[...] we want to report That mistakes in product description and photos it can not be basis for complaint. [...]" So apparently you're buying blind and can get whatever sorta kinda maybe looks like it does in the pictures but not necessarily. Some back and forth later I still could not get a straight answer whether or not they'd be paying for return shipping so I just decided to drop it and not shop there ever again. You'd expect a shop that sells and ships internationally to manage to employ people with the ability to construct comprehensible English sentences (or even a simple apology), but that apparently isn't the case.

I turned my fuming into productive energy by taking the silencer apart and sanding down the text parts. I started with a 600 grit paper and finished off with 1200 to smooth it down.

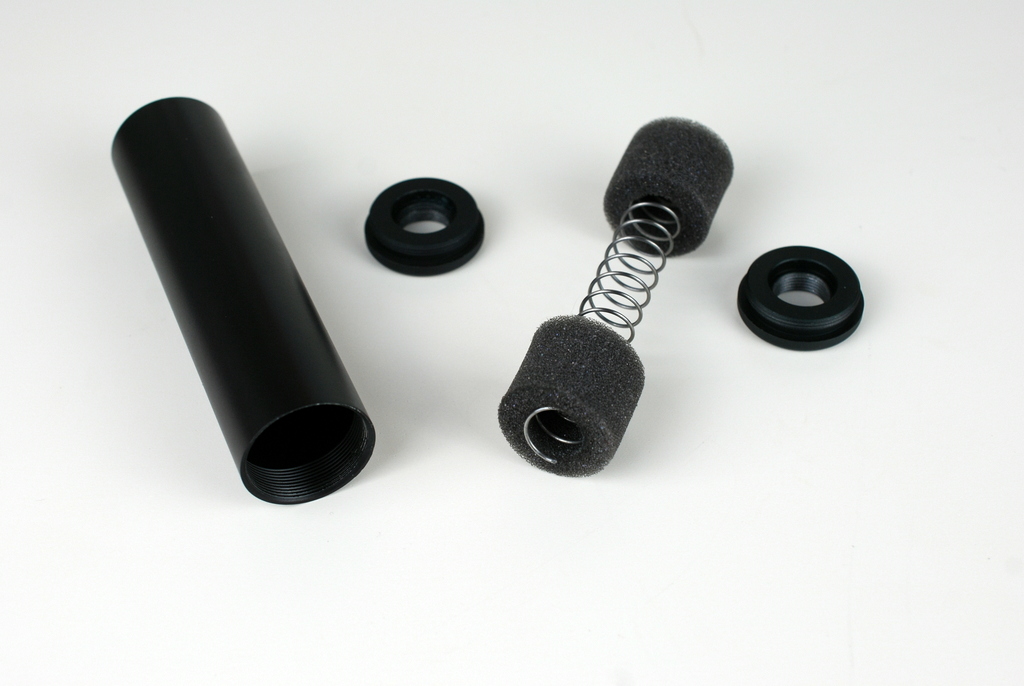
The end caps screwed off and the foam-spring insert removed

A simple piece of steel wire, a screw and a cardboard box made for a pretty good painting set-up.


Three thin spray paint layers later I was pretty happy with the end results. I allowed it to dry overnight and then reassembled the pieces.

The end caps are the original colour, but the difference is quite unnoticeable under natural light conditions

Nothing super special here naturally, but I thought I'd still document this thing. Too many times I've messed up painting something by applying too thick coats and then have the paint run. Patience is definitely key.