
In the following I'll be looking at an M4 variant, the SA-B01 in half-tan, from Specna Arms' AEG line. Compared to the more venerable manufacturers, Specna Arms is a relatively new player in the field, but you need not worry. Their pricing is very attractive, and the quality of manufacture is seriously something you'd expect from far more expensive models.
The review gun was generously supplied by Gunfire.pl. This model, at the time of writing, retails for about 220 EUR. You can get one here.

Unboxing

The gun comes packed in a simple brown cardboard box with only the company logo plastered on top. As I've mentioned before, I'm not very big on fancy packaging, so personally I don't mind this minimalist approach. I'd rather the company put their money in R&D and manufacturing, not in package design.

Flipping the top we find the replica itself, a 300 rd metal magazine, a small bag of BBs, a user manual, a battery (a 7.4V LiPo!), a replacement main spring (M90), a Specna branded paracord bracelet, and quality control paperwork. Everything is securely packed in shape-cut foam. The amount of items and the paperwork immediately exude a feeling of quality.

The box contains hand written QA forms both from Specna themselves and Gunfire, assuring the user the item in the box really performs as it should.
First impressions
Taking the gun out of the box and flipping it around for a while sold me on the external quality very quickly. Everything fits together brilliantly and there is absolutely zero wobble between the upper and lower receiver. Nothing, nada, zilch. The bits sit together better than I've ever seen in a gun from this price range. The front handguard and stock are also extremely sturdy and connect to the gun precisely.
Performance
As mentioned before, this model comes packaged with a lithium polymer battery instead of a typical NiMh. This is definitely a big step forward in my book. On one hand, there is no charger included, but then again, any half serious airsofter these days should be switching over to LiPos anyway and thus most likely has a charger already. Getting a high performance battery and no shoddy wall charger is a win-win in my book.

The battery is an Electro River one with Specna Arms brands, and has the following specifications: 7.4V, 1200 mAh, 25C. Aftermarket batteries go well beyond these numbers, of course, but this is more than enough to run a stock gun extremely well. Connectors on the gun and battery are the basic mini Tamiya you regularly see in stock guns.
Few quick shots made me further impressed with the gun. The running sound is by far the smoothest I have ever heard from a gun just lifted out of the box. There is barely any discernible gear whine and the gun cycles beautifully.

Test shots with the chrono prove the gun really packs a punch and the QA slips weren't there just for show. RPS with the M120 main spring was around 11. Swapping in the M90 CQB spring I got around 97 m/s @ 0.20 g (0.95J) and 12.5 RPS. A curious thing to note is that the stiffer main spring is a regular pitch one, while the less stiff is an irregular. If these were the other way around, the motor would most likely be able to pull the M120 with more ease.

The battery is an Electro River one with Specna Arms brands, and has the following specifications: 7.4V, 1200 mAh, 25C. Aftermarket batteries go well beyond these numbers, of course, but this is more than enough to run a stock gun extremely well. Connectors on the gun and battery are the basic mini Tamiya you regularly see in stock guns.
Few quick shots made me further impressed with the gun. The running sound is by far the smoothest I have ever heard from a gun just lifted out of the box. There is barely any discernible gear whine and the gun cycles beautifully.

Test shots with the chrono prove the gun really packs a punch and the QA slips weren't there just for show. RPS with the M120 main spring was around 11. Swapping in the M90 CQB spring I got around 97 m/s @ 0.20 g (0.95J) and 12.5 RPS. A curious thing to note is that the stiffer main spring is a regular pitch one, while the less stiff is an irregular. If these were the other way around, the motor would most likely be able to pull the M120 with more ease.
Quick Spring Change
This model (and several other Specna guns) comes with what Specna calls the Enter & Convert system, and it's a feature that merits its own section. The system allows you to change the main spring without having to remove the geabox or otherwise pull the gun apart more than very little.

The castle nut on the buffer tube is knurled instead of the typical smooth one. This allows you to loosen and tighten it by hand alone, but it also comes with the standard cutouts for a stock wrench if you want to use that.

Once the castle nut is loosened, the buffer tube also becomes loose, and after twisting it one quarter turn, the tube can slide freely off the shaft on the lower receiver.

The buffer tube shaft ends in a knurled, extended spring guide that is screwed into the shaft. It has holes cut through to insert a tool to loosen/tighten if you wish to use more force than you can exert by hand.

After you twist the tip a few times, it comes off and reveals the spring guide and spring underneath. The only thing left to do for a spring swap is to pull out the old main spring, insert a new one and repeat the process above backwards. It all takes under a minute, even if you're doing it for the very first time, as I was.
This is a brilliant improvement over the traditional closed gearbox, as you can easily tune the power of your gun up or down depending on field regulations. Also, if you do want to work with the internals of the gearbox, this system makes it so much easier to close everything up once you're done, as the main spring is not trying to push everything out of place.
Externals
As already mentioned above, this thing is sturdy by any measure. All parts fit together neatly and tightly. Everything is made of metal apart from the obvious stock, pistol grip and handguard. The materials lend both heft and durability to the rifle. Steel parts include the handguard retainer cap, sling plate on the buffer tube and the buffer tube castle nut.

The metal surfaces are a powder coated black, while the stock, pistol grip and front handguard are a through coloured plastic with a dark(ish) tan hue.

The receiver comes with laser etched markings on the magwell and selector (SAFE, SEMI, AUTO). The selector switch itself clicks into each position very sharply without any wiggle in between.

A simple SPECNA ARMS INDUSTRIES text is present on the flip side. The magazine release button is the type with a small screw holding it in place as opposed to having threads on the inside where you twist the magazine release bar into from the other side.

The right hand side of the magwell also has a sticker which, while reminding us of important factors, does mar the looks somewhat. Luckily it is on there with a very forgiving glue, so it comes off with little effort and leaves behind no discernible residue.

One thing that definitely merits a mention is the functioning bolt catch and fake bolt. Once you pull back the charging handle, the ejection port cover flies open as usual and the fake bolt moves back, but the surprise comes when you notice it does not close when the handle is released. Not only does this obviously make it easier to adjust the hop up at your leisure, but pressing the bolt release on the left hand side of the upper receiver also makes the spring loaded fake bolt fly forward, making a nice little ding as it hits the end of its travel! Extra coolness factor right there.
The take-down pin is secured with a hex bolt, so you need tools to remove the upper. On the upside, the pin won't go anywhere when you don't want it to.
Internals
The gun comes standard with stiff high diameter wiring that has a thin jacket. This both makes sure power goes where it should and eases the trouble of threading wires through openings.
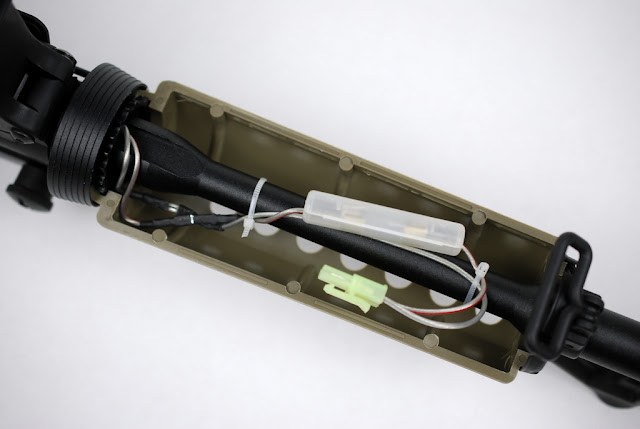
The gun is wired to the front with a standard 25A glass tube fuse and mini Tamiya connectors. My personal preference is for deans connectors and bladed fuses, but this is naturally up to each individual end user.

Taking out the barrel you'll notice the hop-up unit is a cast metal affair with your usual M4 style hop-up adjustment wheels.

The business end of the barrel has a fairly deeply cut crown, something you don't often see on stock guns. The inside of the barrel is also highly polished.

One definitely interesting feature is that the pistol grip bottom plate has (plenty of) thread locker on the motor height adjustment screw. On the one hand I like the fact that Specna have done the adjustment for me (and have done it extremely well, don't get me wrong), while on the other I find it rather annoying that if and when I do need to adjust the height, I need to get through this stuff first.

Motor wires are threaded through the back side of the motor, which is again something you don't often see in guns of this price range. These guys definitely know what they're doing.

Pulling the motor out reveals more quality control measures. An eternal sceptic, it did come to me that me not knowing what the QC process is does sort of make it hard to say how much more reliable this gun is compared to the next, but in the end it is a nice touch and serves to make the user feel more secure. The motor itself is sadly a rather plain, ferrous magnet one. I would say the motor is the weakest link in what otherwise seems like an amazing product.

Once we get to the actual gearbox, more nice touches come to light. The left hand side has a cutout that allows you to trip the anti-reversal latch in case the gearbox gets jammed. You should be able to do this just by removing the pistol grip, with the gearbox still in the gun.

Another cutout is present on the front of the gearbox, which will make shimming the box a whole lot easier. Seeing the bevel and pinion mesh with the gearbox closed is something that you typically need to drill a hole for. Very nice features here!

The right hand side of the box shows a Specna Arms logo, and the bolt catch rocker with its spring. Do be careful with the spring, it is very easy to slip it out and have it fly across the room (obviously did not happen to me in the slightest). As can be seen, the gearbox has 8 mm steel ball bearings on all gears. While this reduces rolling resistance, especially harder springs may bring about catastrophic failure by causing the side wall of the bearing to split. That's something to keep in mind, especially since the spring change itself is so easy. Switching to bushings on the spur gear should already alleviate the problem considerably.

The box is held together by size 9 torx screws, so you'll need a bit more than a regular screwdriver to get inside. Once there, your eye is immediately caught by the blue colour of all the plastic parts. The colour would hint at SHS, but I sadly do not have information whether or not this is so. Still, they feel sturdy and function just as they should. The sector gear has a standard thin tappet post and sadly no delayer chip.

The gears sat in the box very snugly. Not too tight, not too loose. What you'd normally call good shimming. In this case, though, the entire gearbox contained only one single shim, on the top side of the bevel gear. To me this speaks volumes of the type of tolerances the gearbox is made to. I'm totally amazed by what I am seeing!

One downside to this otherwise brilliantly built gearbox is the obvious low amount of lube. What there is, though, is much higher quality stuff than the brown gunk you typically see in lower price guns. Most likely the grease is silicone based, which is a lovely thing to see. Another annoying thing was to find a metal shaving in the piston rail. I don't think it could have sat there while I test fired the gun, so it must have fallen from somewhere as I took the gearbox apart, but it still is a curious thing to see and means that somewhere in the box there was a piece like this left hanging from the casting process.

A third downer I ran into was the cylinder head. While there's nothing wrong per se in the build or quality, mine came with odd damage on the rubber pad. These could possibly match the metal shaving above, but there's no way to be sure at this point.

The piston has a steel 15 tooth rack with a polymer body. Seems like it could take a fairly high stress.

Curiously, the nozzle does not have an o-ring, which is something I definitely expected to see. Still, the gun achieves very good compression with this nozzle as well.
Putting the gearbox back together is simply a breeze compared to a traditional box. Since the main spring is not creating tension, you don't need to fight against the spring trying to exit the box at the most unopportune moment or trying to get the anti-reversal latch or bearings/axle to line up with their holes. Simply drop the lid in place and start screwing. It's what I'd call an open-and-shut case (I'm sorry).
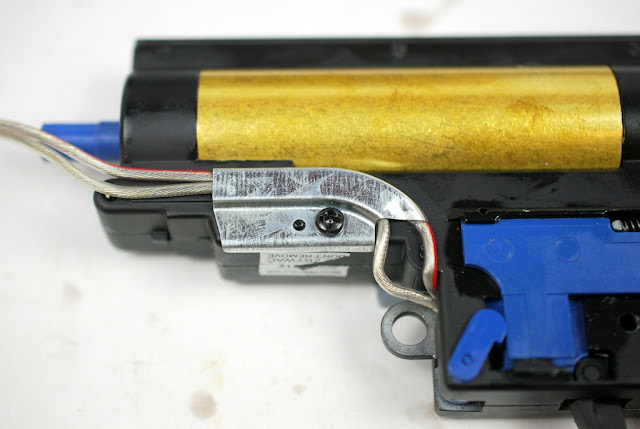
One further brilliant thing about the gearbox is the metal wire holder that screws onto the side of the gearbox. It guides the wires brilliantly in the right direction, keeping them out of the magazine well. A small thing, but works wonders!

The gun is wired to the front with a standard 25A glass tube fuse and mini Tamiya connectors. My personal preference is for deans connectors and bladed fuses, but this is naturally up to each individual end user.

Taking out the barrel you'll notice the hop-up unit is a cast metal affair with your usual M4 style hop-up adjustment wheels.

The business end of the barrel has a fairly deeply cut crown, something you don't often see on stock guns. The inside of the barrel is also highly polished.

One definitely interesting feature is that the pistol grip bottom plate has (plenty of) thread locker on the motor height adjustment screw. On the one hand I like the fact that Specna have done the adjustment for me (and have done it extremely well, don't get me wrong), while on the other I find it rather annoying that if and when I do need to adjust the height, I need to get through this stuff first.

Motor wires are threaded through the back side of the motor, which is again something you don't often see in guns of this price range. These guys definitely know what they're doing.

Pulling the motor out reveals more quality control measures. An eternal sceptic, it did come to me that me not knowing what the QC process is does sort of make it hard to say how much more reliable this gun is compared to the next, but in the end it is a nice touch and serves to make the user feel more secure. The motor itself is sadly a rather plain, ferrous magnet one. I would say the motor is the weakest link in what otherwise seems like an amazing product.

Once we get to the actual gearbox, more nice touches come to light. The left hand side has a cutout that allows you to trip the anti-reversal latch in case the gearbox gets jammed. You should be able to do this just by removing the pistol grip, with the gearbox still in the gun.

Another cutout is present on the front of the gearbox, which will make shimming the box a whole lot easier. Seeing the bevel and pinion mesh with the gearbox closed is something that you typically need to drill a hole for. Very nice features here!

The right hand side of the box shows a Specna Arms logo, and the bolt catch rocker with its spring. Do be careful with the spring, it is very easy to slip it out and have it fly across the room (obviously did not happen to me in the slightest). As can be seen, the gearbox has 8 mm steel ball bearings on all gears. While this reduces rolling resistance, especially harder springs may bring about catastrophic failure by causing the side wall of the bearing to split. That's something to keep in mind, especially since the spring change itself is so easy. Switching to bushings on the spur gear should already alleviate the problem considerably.

The box is held together by size 9 torx screws, so you'll need a bit more than a regular screwdriver to get inside. Once there, your eye is immediately caught by the blue colour of all the plastic parts. The colour would hint at SHS, but I sadly do not have information whether or not this is so. Still, they feel sturdy and function just as they should. The sector gear has a standard thin tappet post and sadly no delayer chip.

The gears sat in the box very snugly. Not too tight, not too loose. What you'd normally call good shimming. In this case, though, the entire gearbox contained only one single shim, on the top side of the bevel gear. To me this speaks volumes of the type of tolerances the gearbox is made to. I'm totally amazed by what I am seeing!

One downside to this otherwise brilliantly built gearbox is the obvious low amount of lube. What there is, though, is much higher quality stuff than the brown gunk you typically see in lower price guns. Most likely the grease is silicone based, which is a lovely thing to see. Another annoying thing was to find a metal shaving in the piston rail. I don't think it could have sat there while I test fired the gun, so it must have fallen from somewhere as I took the gearbox apart, but it still is a curious thing to see and means that somewhere in the box there was a piece like this left hanging from the casting process.

A third downer I ran into was the cylinder head. While there's nothing wrong per se in the build or quality, mine came with odd damage on the rubber pad. These could possibly match the metal shaving above, but there's no way to be sure at this point.

The piston has a steel 15 tooth rack with a polymer body. Seems like it could take a fairly high stress.

Curiously, the nozzle does not have an o-ring, which is something I definitely expected to see. Still, the gun achieves very good compression with this nozzle as well.
Putting the gearbox back together is simply a breeze compared to a traditional box. Since the main spring is not creating tension, you don't need to fight against the spring trying to exit the box at the most unopportune moment or trying to get the anti-reversal latch or bearings/axle to line up with their holes. Simply drop the lid in place and start screwing. It's what I'd call an open-and-shut case (I'm sorry).

One further brilliant thing about the gearbox is the metal wire holder that screws onto the side of the gearbox. It guides the wires brilliantly in the right direction, keeping them out of the magazine well. A small thing, but works wonders!
Magazine compatibility test
As I had some different makes of magazines lying around, I got the idea of testing them on the gun to see how they fit. I also enlarged the selection by borrowing some extra magazines from friends as well, and the results are as follows:
| Make & model | Fit | Feeding | Release |
|---|---|---|---|
| Dboys metal lowcap | Sits in nice and snug, occasional slight wiggle required to mate the mag with hop-up unit | Feeds without issues | Falls out when magazine release is pushed |
| Dboys metal VN style midcap | Sits in nice and snug, seats without any wiggles, best fit of the bunch | Feeds without issues | Falls out when magazine release is pushed |
| Ares Amoeba plastic midcap | Fits inside the magwell but will not seat | N/A | N/A |
| Dytac Invader plastic midcap | Just barely fits inside the magwell and seats when pushed with considerable force | Feeds without issues | Hangs when magazine release is pushed, requires considerable pulling to get out |
Final thoughts
The Specna Arms SA-B01 SAEC is, simply put, brilliant. The quality compared to the price is just amazing. The externals are to die for, the internals are high quality and the quick spring change function makes tuning a breeze. Top this off with cool little touches like the functional bolt catch and release, and I'm hard pressed to find anything that would really compare. If you're looking for a new M4, you really cannot go wrong with this one. Get yours here. Or, if going old skool isn't your thing, Specna also offer other, more exotic models.Pros and cons - A TL;DR
Pros
- Glorious external quality with functional bolt catch
- Amazing fit between parts
- M120 and M90 spring included
- Quick spring change system
- 7.4V LiPo battery included
- Robust internals with great compression
Cons
- Not a lot of lube in GB
- No delayer chip on sector gear
Suomenkielinen tiivistelmä
Specna Arms on verrattain tuore valmistaja airsoft-asemarkkinoilla, ja vaikka hinnoittelu on edullisemmasta päästä, aseiden laatu on erittäin korkea. Seuraava on suomenkielinen tiivistelmä yllä olevasta englanninkielisestä arvostelusta. Tarkasteltava malli on SA-B01 half-tan-värityksellä. Arvostelukappaleen toimitti puolalainen Gunfire.pl, ja kyseinen laitos löytyy heidän sivuiltaan täältä. Arvosteluhetkellä myyntihinta on noin 220 euroa.
Ase saapui pakattuna simppeliin, vähäeleiseen pahvilaatikkoon. Koruttomasta ulkokuoresta huolimatta laatikosta löytyy muotoonleikatusta vaahtomuovista erittäin maukas paketti. Itse aseen ja metallikuorisen hicap-lippaan (300 kuulaa) lisäksi sisällä on LiPo-akku (7,4 V, 1200 mAh), kevyempi vaihtojousi (M90) sekä niin Specnan kuin Gunfirenkin laadunvarmistusdokumentit kronotustuloksineen. Kaikin puolin on nähtävissä, että laadun tunteen välittämiseen on panostettu. Erityisesti LiPo-akku on itselleni mieleen, koska aika on jo ajanut ohi kehnommin toimivista NiMh:eistä ja LiPo-akkujen lastentaudit ovat lähinnä historiaa. Paketissa ei ole laturia, mutta perinteisesti aseiden mukana toimitetut laturit ovat muutenkin olleet lähinnä elektroniikkajätettä.
Itse ase tuntuu välittömästi käsissä erittäin tukevalta. Metalliosia on käytetty kaikissa oikeaa M4:ää vastaavissa paikoissa. Siinä missä varsinkin halvemmissa AR-sarjalaisissa ylä- ja alarungon välillä on heilumisena nähtävää selvää sovitusongelmaa, tässä ei ole moisesta häivääkään. Osat sopivat toisiinsa täydellisesti ja myöhemmin asetta purkaessani sain käyttää selkeästi voimaa erottaakseni ylärungon alarungosta. Toleranssit ovat siis enemmän kuin kohdillaan.
Ulko-osat ovat kaikin puolin erittäin jämäkän tuntuiset ja hienosti viimeistellyt. Aseessa on myös toimiva lukonvapautin, eli viritinkahvasta vetämällä hylsyportti aukeaa ja feikkilukko lukkiutuu taka-asentoon. Lukonvapauttimesta painettaessa feikkilukko lennähtää eteen mukavan kilahduksen säestämänä. Tämä paitsi helpottaa hopinsäätöä, myös lisää kokonaisuuteen kivan fiilistelyelementin.
Useissa Specnan aseissa, kuten tässäkin, on erittäin mainio Enter & Convert -nimellä kulkeva jousen pikavaihtojärjestelmä. Paketista nostettaessa aseessa sisällä ollut jousi on M120-tasoa (krono näytti n. 1,7 joulea 0,20-grammaisella kuulalla), ja mukana tuli myös kevyempi, M90-tason jousi sisäpelejä ajatellen (kronotti sopivasti juuri alle joulen). Jousenvaihto onnistuu erittäin vikkelästi ja asetta juurikaan purkamatta.
Bufferiputken juuressa oleva pidätinmutteri on karhennettu, ja sen löysäämisen jälkeen itse putki on liikuteltavissa. Kun putkea sitten kääntää noin neljänneskierroksen, sen sisällä olevat hahlot kohdistuvat putken karan tappien kanssa, ja koko putki voidaan näin vetää pois. Alta paljastuu pidennetty jousenohjain, joka irtoaa niin ikään kiertämällä. Tämän jälkeen sisällä ollut jousi voidaan vaihtaa toiseen ja toistaa em. prosessi käänteisessä järjestyksessä. Jopa ensikertalaiselta toimitukseen kului kaikkineen alle minuutti.
Jousen pikavaihto-ominaisuuden ansiosta myös rataslaatikon kanssa puuhastelu helpottuu merkittävästi, kun jousi ei ole vääntämässä osia sijoiltaan avaamis- ja sulkemisvaiheessa. Laatikosta löytyy teräsrattaat 8 mm kuulalaakereilla, SHS:ää henkivät siniset muoviosat ja teräshampainen mäntä. Rasvaa oli omaan mieleeni hieman vähänlaisesti, mutta se oli selkeästi korkeampilaatuista kuin tyypillisesti sisuksista löytyvä ruskea mönjä. Suuttimessa ei ole o-rengasta, mikä oli pienoinen yllätys. Moottori on ikävän perinteinen, heikoilla ferriittimagneeteilla varustettu kapine ja onkin täten muuten loistavan kokonaisuuden selkeästi heikoin osa. LiPo-akusta huolimatta liipaisuviive ja tulinopeus tahtovatkin jättää tällä moottorilla toivomisen varaa. Osien yhteensopivuus jatkuu mallikkaana myös rataslaatikon puolella, ja aseen käyntiääni on yksinkertaisesti siistein mihin olen ikinä vakioaseessa törmännyt.
Kaiken kaikkiaan Specna Armsin SA-B01 on suorastaan loistava valinta AR-sarjalaiseksi. Hyvyys korostuu erityisesti hintaan verrattaessa. Moottorin vaihto paremmin vääntävään tekisi paketista vielä mallikkaamman, mutta tällaisenaankin kyseessä on yksinkertaisesti mahtava paketti.


