

Thursday, 24 September 2015
Instagrammin'
I decided to get my Insta on, so in the future you can find quick gun, gear and project snaps on instagram under the username talaar_tech. Let's see how this goes.


Monday, 21 September 2015
Fixer-upper Part 3: TM SIG 552
I can't seem to help myself when it comes to a deal that looks too good to pass (this is your cue to tell me about the bridge you have for sale).
Patient: Tokyo Marui SIG 552
Symptoms: "Shop-tuned to M120 or M150, piston broken IIRC, sat in a closet for 5 or so years"

I got this gun from the very same Facebook for-sale group as the previous two guns in this series. I can't really find that many boneyard guns from shops around here, because (I guess) the number of active airsofters is rather low and shops thus have precious little to offer when it comes to broken guns.
The gun was indeed rather worn and dirty, plus the upper receiver had cracked on both sides just behind the front handguard.


I had heard horror stories about how difficult these guns are to take apart and put together, but I forged on with confidence. My first move, once I got the upper receiver off, was to clean out any dirt and grease, and glue the cracked parts back together as best I could.

I used brake cleaner to get all the grease off and then took a rough file to the inner edges of the cracked parts. I was hoping to make them rougher without altering the look of the outside surface.

This was followed by taping the two sides together with some vinyl tape, which I hoped would both align the parts properly, hold them together while the glue dried, and also prevent any excess glue from seeping on the outside. I was hoping for a very nice and smooth end result.

I applied a rather sticky universal glue (which has worked very well on other plastics in the past) to the inside of the crack by slightly bending the taped-together sides apart and then pressed the two sides back together. I also similarly filed and taped the other side of the receiver, which had the smaller crack right at the edge of the ejection port, and then left the glue to dry.
I continued with the disassembly to get to the gearbox and see what kind of a disaster waited inside. As soon as I got the motor out, I wanted to see if the electrics of the gun were in working order. The motor spun very nicely and without any weird noise, so at least there were no electrical faults.


There were a number of very small pieces which apparently are all needed in order to make the fire selector work its magic. I'm not saying I could design a better system myself, but it does look kind of over engineered.
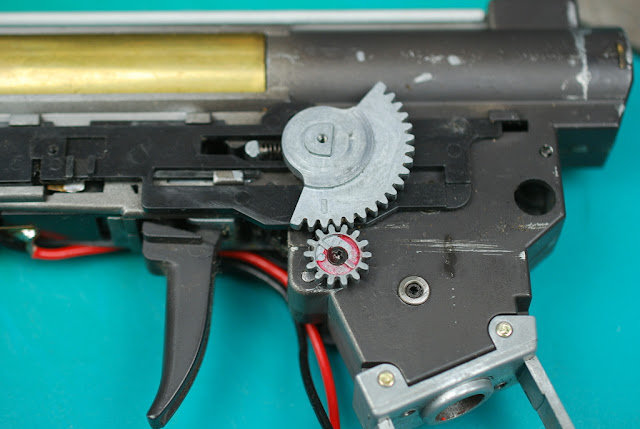
I thought I might run into some potential trouble when putting the thing back together, but at least I had plenty of pictures for reference!
Once I took the selector plate off, I also noticed a rather interesting solution to a missing contact surface on the selector. The two contacts had simply been soldered together, so basically the only thing keeping the gun from being fired on safe was the physical piece of metal stopping the trigger from moving. Since I didn't have a spare selector plate, though, I left it the way it was. The block stopping the trigger is, after all, pretty sturdy, so accidental discharge isn't really that likely.

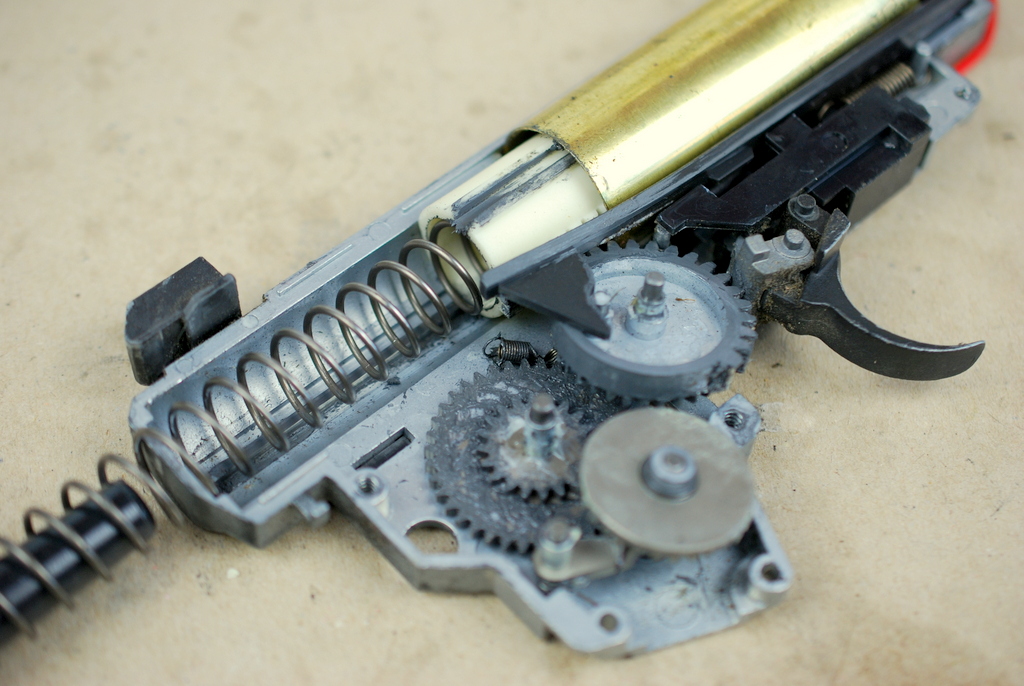
Once I got inside the gearbox, I could not readily tell anything was completely destroyed. The piston teeth had worn down somewhat, but they still had plenty of surface left for the sector gear teeth to catch onto. The piston had one metal tooth and a ported aluminium piston head. I decided to keep using it until it breaks.

I hadn't chronoed the gun before opening it since I was under the assumption there was something broken in the gearbox, so I had no idea about the rate of the main spring. The wire seemed to be rather thick, but as I compared it to an SHS M110 that I had lying around, I noticed the mystery spring was also quite a bit shorter.

So, basically, still had no idea what the rate was. At first I thought I would put the gun together with the mystery spring first, then put in the M110 for actual use, since an M150 especially would be complete overkill for a weapon of this size (which is the rate the previous owner thought the spring might be rated at). In the end, I decided against this idea and opted to test the mystery spring with a gun that requires a bit less work in the reassembly department.
The other bits inside seemed to be fairly high end. All gears were made of steel, although unmarked. Still, definitely not the stock Marui gears that are, I guess, pressed together from leftover porridge and snot.

The gearbox was shimmed pretty ok from the get-go. The gears had very little play with the box screwed together, but apparently they were shimmed a bit too close together, as is apparent from these marks on the sector gear.

As I took out the gears to degrease and re-grease the gearbox, I kept my eye on where all the shims came from so that when putting it all back together, I could switch shim thicknesses to set the height of the gears in relation to each other properly while still keeping the same overall gear height inside the gearbox.
While the gears soaked in brake cleaner, I moved back to the upper receiver, as I had more plans on how to make the glued parts hold together a bit better.
I sanded down the insides of the front of the receiver with 80 grit paper in order to, again, give the glue a better surface to stick onto.

And now came my masterstroke. I cut out strips from a drinks can and sanded the surface down.

Finally I poked some holes into the strip to allow the glue to both dry faster and also seep through the metal and possibly make an even stronger bond with the plastic surface. All that was left was to press the strip into place and cut out any excess.

I put similar strips on both sides, anticipating the old ABS plastic might be on the frail side and the receiver might crack on the other side in the future. I used a smaller piece on the little crack on the corner of the ejection port, and a larger on the side where the piece had snapped off completely. I left the glue to dry overnight and moved back to the gearbox.
No major hiccups occurred in putting the box back into working shape. I greased it all around rather amply and tested the compression of the cylinder with and without the nozzle (and saw that it was good). I put the box together only so far that I might test fire it outside of the gun, and that is when I noticed the trigger wasn't returning to the front on semi. After some puzzling, it became obvious there was no trigger return spring, and the trigger was simply pushed back into place on full auto by the trigger switch return spring (on semi the cutoff naturally snapped the trigger switch back over the trigger).
So, in the spirit of this blog, I went and did it all again. Unscrew, release main spring, the works. At first I thought I'd simply lost the return spring at some point, but as I went through my pictures, it was apparent there never was one. I racked my brain for a while as to where the get a replacement part, since I did not have one in store.
A quick session of back and forth pacing got my brain working, and I went for my SO's stash of safety pins. I reasoned that if I only found a suitable size, I could bend it to shape and be done with it. Of course there was none large enough, but as luck would have it, I noticed I could just bend it open just enough to slip it onto the trigger post. After that, with some pliers and side cutters, I fashioned a perfect trigger return spring (still in progress pictured below).

With the new spring in place, I set out to reassemble the gearbox. Of course, this time the main spring would resist my attempts until the very last, whereas the first time it had simply slid in without any problems. I had to try three or four times before I got everything in place, but after that I was set. I ran into no more mishaps in putting the gearbox back into the gun and reassembling everything. Unless you count the fact I had not properly run the negative motor cable into a slot on the side of the gearbox, and had to again take out the selectors and all sorts of little bits and pull the gearbox out of the receiver in order to thread the wire through the slot. Wheeee! At least nothing broke. I left the gun with the lower receiver assembled in order to let the glue on the upper dry and then finish the assembly.

In the end, the seam was left rather visible, but the joint is extremely sturdy now.

I finished the project off by first installing a fuse box and a fuse since the gun did not have a box, let alone a fuse, when it came to me.
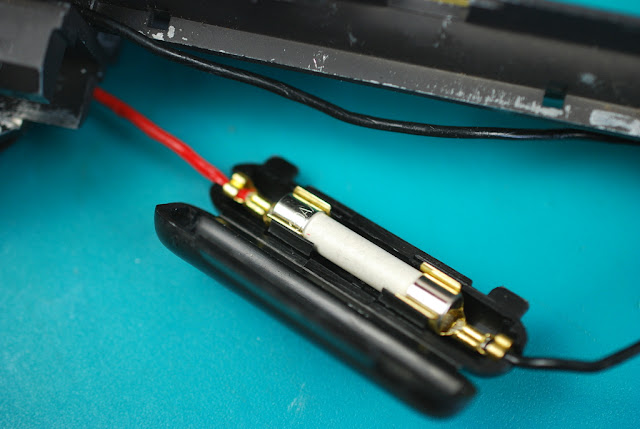
With the gun all in one piece, I hooked up a battery and dry fired the gun a few times. Everything sounded great, the gun fired as intended and all was well. Apart from the fact I had not a single magazine, because the gun came with none. The SIG 552 uses proprietary magazines (of course), so I had to improvise. Digging through my selection of mags, I found out the MP5 ones were slim enough to fit the magwell. They did not lock into place, obviously, but I had enough hands that I could set up a chrono and shoot for a bit to see how the old girl performed. And I must say, I was pretty pleased with the results.

Now, if I could only get my hands on some magazines, I could get rocking with this thing.
Patient: Tokyo Marui SIG 552
Symptoms: "Shop-tuned to M120 or M150, piston broken IIRC, sat in a closet for 5 or so years"

I got this gun from the very same Facebook for-sale group as the previous two guns in this series. I can't really find that many boneyard guns from shops around here, because (I guess) the number of active airsofters is rather low and shops thus have precious little to offer when it comes to broken guns.
Day 1
Since the previous owner had a feeling the piston had broken, I didn't even bother to try and fire the gun once I got it, but instead dug right in and started taking it apart.The gun was indeed rather worn and dirty, plus the upper receiver had cracked on both sides just behind the front handguard.


I had heard horror stories about how difficult these guns are to take apart and put together, but I forged on with confidence. My first move, once I got the upper receiver off, was to clean out any dirt and grease, and glue the cracked parts back together as best I could.

I used brake cleaner to get all the grease off and then took a rough file to the inner edges of the cracked parts. I was hoping to make them rougher without altering the look of the outside surface.

This was followed by taping the two sides together with some vinyl tape, which I hoped would both align the parts properly, hold them together while the glue dried, and also prevent any excess glue from seeping on the outside. I was hoping for a very nice and smooth end result.

I applied a rather sticky universal glue (which has worked very well on other plastics in the past) to the inside of the crack by slightly bending the taped-together sides apart and then pressed the two sides back together. I also similarly filed and taped the other side of the receiver, which had the smaller crack right at the edge of the ejection port, and then left the glue to dry.
I continued with the disassembly to get to the gearbox and see what kind of a disaster waited inside. As soon as I got the motor out, I wanted to see if the electrics of the gun were in working order. The motor spun very nicely and without any weird noise, so at least there were no electrical faults.

Once I got the pistol grip and fire selectors off, I found out what a finicky, multi part thing the selector assembly was. It was made all the more fun by the fact that the crescent shaped gears were simply held in place by being stuck between the walls of the gearbox and the receiver, i.e. they fell right off as I didn't have enough sense to hold onto them as I pulled the gearbox out.

There were a number of very small pieces which apparently are all needed in order to make the fire selector work its magic. I'm not saying I could design a better system myself, but it does look kind of over engineered.

I thought I might run into some potential trouble when putting the thing back together, but at least I had plenty of pictures for reference!
Once I took the selector plate off, I also noticed a rather interesting solution to a missing contact surface on the selector. The two contacts had simply been soldered together, so basically the only thing keeping the gun from being fired on safe was the physical piece of metal stopping the trigger from moving. Since I didn't have a spare selector plate, though, I left it the way it was. The block stopping the trigger is, after all, pretty sturdy, so accidental discharge isn't really that likely.

Once I got inside the gearbox, I could not readily tell anything was completely destroyed. The piston teeth had worn down somewhat, but they still had plenty of surface left for the sector gear teeth to catch onto. The piston had one metal tooth and a ported aluminium piston head. I decided to keep using it until it breaks.

I hadn't chronoed the gun before opening it since I was under the assumption there was something broken in the gearbox, so I had no idea about the rate of the main spring. The wire seemed to be rather thick, but as I compared it to an SHS M110 that I had lying around, I noticed the mystery spring was also quite a bit shorter.

So, basically, still had no idea what the rate was. At first I thought I would put the gun together with the mystery spring first, then put in the M110 for actual use, since an M150 especially would be complete overkill for a weapon of this size (which is the rate the previous owner thought the spring might be rated at). In the end, I decided against this idea and opted to test the mystery spring with a gun that requires a bit less work in the reassembly department.
The other bits inside seemed to be fairly high end. All gears were made of steel, although unmarked. Still, definitely not the stock Marui gears that are, I guess, pressed together from leftover porridge and snot.

The gearbox was shimmed pretty ok from the get-go. The gears had very little play with the box screwed together, but apparently they were shimmed a bit too close together, as is apparent from these marks on the sector gear.

As I took out the gears to degrease and re-grease the gearbox, I kept my eye on where all the shims came from so that when putting it all back together, I could switch shim thicknesses to set the height of the gears in relation to each other properly while still keeping the same overall gear height inside the gearbox.
While the gears soaked in brake cleaner, I moved back to the upper receiver, as I had more plans on how to make the glued parts hold together a bit better.
I sanded down the insides of the front of the receiver with 80 grit paper in order to, again, give the glue a better surface to stick onto.

And now came my masterstroke. I cut out strips from a drinks can and sanded the surface down.

Finally I poked some holes into the strip to allow the glue to both dry faster and also seep through the metal and possibly make an even stronger bond with the plastic surface. All that was left was to press the strip into place and cut out any excess.

I put similar strips on both sides, anticipating the old ABS plastic might be on the frail side and the receiver might crack on the other side in the future. I used a smaller piece on the little crack on the corner of the ejection port, and a larger on the side where the piece had snapped off completely. I left the glue to dry overnight and moved back to the gearbox.
No major hiccups occurred in putting the box back into working shape. I greased it all around rather amply and tested the compression of the cylinder with and without the nozzle (and saw that it was good). I put the box together only so far that I might test fire it outside of the gun, and that is when I noticed the trigger wasn't returning to the front on semi. After some puzzling, it became obvious there was no trigger return spring, and the trigger was simply pushed back into place on full auto by the trigger switch return spring (on semi the cutoff naturally snapped the trigger switch back over the trigger).
So, in the spirit of this blog, I went and did it all again. Unscrew, release main spring, the works. At first I thought I'd simply lost the return spring at some point, but as I went through my pictures, it was apparent there never was one. I racked my brain for a while as to where the get a replacement part, since I did not have one in store.
A quick session of back and forth pacing got my brain working, and I went for my SO's stash of safety pins. I reasoned that if I only found a suitable size, I could bend it to shape and be done with it. Of course there was none large enough, but as luck would have it, I noticed I could just bend it open just enough to slip it onto the trigger post. After that, with some pliers and side cutters, I fashioned a perfect trigger return spring (still in progress pictured below).

With the new spring in place, I set out to reassemble the gearbox. Of course, this time the main spring would resist my attempts until the very last, whereas the first time it had simply slid in without any problems. I had to try three or four times before I got everything in place, but after that I was set. I ran into no more mishaps in putting the gearbox back into the gun and reassembling everything. Unless you count the fact I had not properly run the negative motor cable into a slot on the side of the gearbox, and had to again take out the selectors and all sorts of little bits and pull the gearbox out of the receiver in order to thread the wire through the slot. Wheeee! At least nothing broke. I left the gun with the lower receiver assembled in order to let the glue on the upper dry and then finish the assembly.
Day 2
The following day I returned to attach the upper and lower receiver together, and naturally wanted to test how strongly my glue had set. Some of the edges of the aluminium strips were not completely attached, and as I pulled on them with less than moderate force, the strips simply came off. My glue obviously was not really at all compatible with my materials. In the end I had to sand the surfaces down for a second time, and this time went with the ever trusty cyanoacrylate. Super glue itself is rather poor when it comes to stressing the joint (it tends to crack when bending, for example), but since I now had a large flat area and I was basically making a composite piece of material, I decided to give it a go. Super glue worked very nicely in attaching the two surfaces together, and the only problem was the dried glue on my fingertips afterwards. I just had to cut out the excess material that covered the holes in the plastic.
In the end, the seam was left rather visible, but the joint is extremely sturdy now.

I finished the project off by first installing a fuse box and a fuse since the gun did not have a box, let alone a fuse, when it came to me.

With the gun all in one piece, I hooked up a battery and dry fired the gun a few times. Everything sounded great, the gun fired as intended and all was well. Apart from the fact I had not a single magazine, because the gun came with none. The SIG 552 uses proprietary magazines (of course), so I had to improvise. Digging through my selection of mags, I found out the MP5 ones were slim enough to fit the magwell. They did not lock into place, obviously, but I had enough hands that I could set up a chrono and shoot for a bit to see how the old girl performed. And I must say, I was pretty pleased with the results.

Now, if I could only get my hands on some magazines, I could get rocking with this thing.
Wednesday, 16 September 2015
Hi Capa Update and Farewells
I know, it's two months since the last update. I have a lot new projects lined up, some of them actually already finished and photographed, but I just lack the time to do the write-ups. Until then, though, here to whet your appetite is a quick post about a small update on the WE Hi Capa I wrote about earlier.
I got a bit bored with the gun after a while, to be honest. The lack of Serpa holsters for the model also got me a bit miffed, so I've had the gun just sit on my shelf gathering dust. I've tried to sell it off a few times, and now I found a buyer. I am ready to bid adieu to the very nice but, for me personally, useless pistol.
As you may remember, the gun was missing the safety lever plunger and its spring, which I replaced with a piece of wire jacket and a toothpick.

I though the new owner might find this arrangement a bit odd, so I decided to go ahead and quickly fashion a new plunger to replace this admittedly fine piece of craftsmanship.

I got a short piece of spring from a disposable lighter (the same spring I used as a cutoff lever return spring on the M4). The slide lock plunger fit on the one end perfectly.

I wanted to have the other end of the spring in the same shape, so I carefully squeezed it from several sides, resulting in a surprisingly nice taper.

Next, I took some raw material to fashion the safety plunger from. If you know me, you know I very rarely throw anything away. This is why I could easily source a fine mandrel from a used pop rivet (I knew I kept these for a reason), which I only needed to machine into shape. My first idea was to simply tighten it on my rotary tool and grind the ends to suit, but it turned out the mandrel was too thin to properly tighten. A few twists of electrical tape fixed that though!

The rotary tool at 10,000 rpm, I first did a rough grind on the end that would face the safety, in order to get a roughly round shape. Then I finished it off with some 600 grit sandpaper to get a smooth finish. Compared to filing by hand, this was a very nice method to get what I wanted, plus the end became round almost by itself.

The second part of the job was to turn the mandrel around to grind down the other end. I wanted a roughly similar shape to the plunger as the original slide stop plunger.

For this end I only used a rough file, as I noticed that the spring caught on a rough surface better than a smooth surface.

It turned out I had given myself a bit too much working allowance on the mandrel, and had to cut it down by around 2mm and rework the end, because it was too long even with the spring completely compressed. I chose to redo the safety end as that was easier to get right. After that I simply inserted the spring-plunger combination, which fit in very nicely.

And finally, all that was left was to reinstall the safeties and the slide.

I got a very nice, smooth yet crisp movement of the safety from this endeavour. I guess this mostly goes to show you don't always need to buy spare parts if you can make them. Have you made your own spare parts? Let me know in the comments.
Now I'm off to put this baby in a box and ship it off to a new owner. More projects coming up!
I got a bit bored with the gun after a while, to be honest. The lack of Serpa holsters for the model also got me a bit miffed, so I've had the gun just sit on my shelf gathering dust. I've tried to sell it off a few times, and now I found a buyer. I am ready to bid adieu to the very nice but, for me personally, useless pistol.
As you may remember, the gun was missing the safety lever plunger and its spring, which I replaced with a piece of wire jacket and a toothpick.

I though the new owner might find this arrangement a bit odd, so I decided to go ahead and quickly fashion a new plunger to replace this admittedly fine piece of craftsmanship.

I got a short piece of spring from a disposable lighter (the same spring I used as a cutoff lever return spring on the M4). The slide lock plunger fit on the one end perfectly.

I wanted to have the other end of the spring in the same shape, so I carefully squeezed it from several sides, resulting in a surprisingly nice taper.

Next, I took some raw material to fashion the safety plunger from. If you know me, you know I very rarely throw anything away. This is why I could easily source a fine mandrel from a used pop rivet (I knew I kept these for a reason), which I only needed to machine into shape. My first idea was to simply tighten it on my rotary tool and grind the ends to suit, but it turned out the mandrel was too thin to properly tighten. A few twists of electrical tape fixed that though!

The rotary tool at 10,000 rpm, I first did a rough grind on the end that would face the safety, in order to get a roughly round shape. Then I finished it off with some 600 grit sandpaper to get a smooth finish. Compared to filing by hand, this was a very nice method to get what I wanted, plus the end became round almost by itself.

The second part of the job was to turn the mandrel around to grind down the other end. I wanted a roughly similar shape to the plunger as the original slide stop plunger.

For this end I only used a rough file, as I noticed that the spring caught on a rough surface better than a smooth surface.
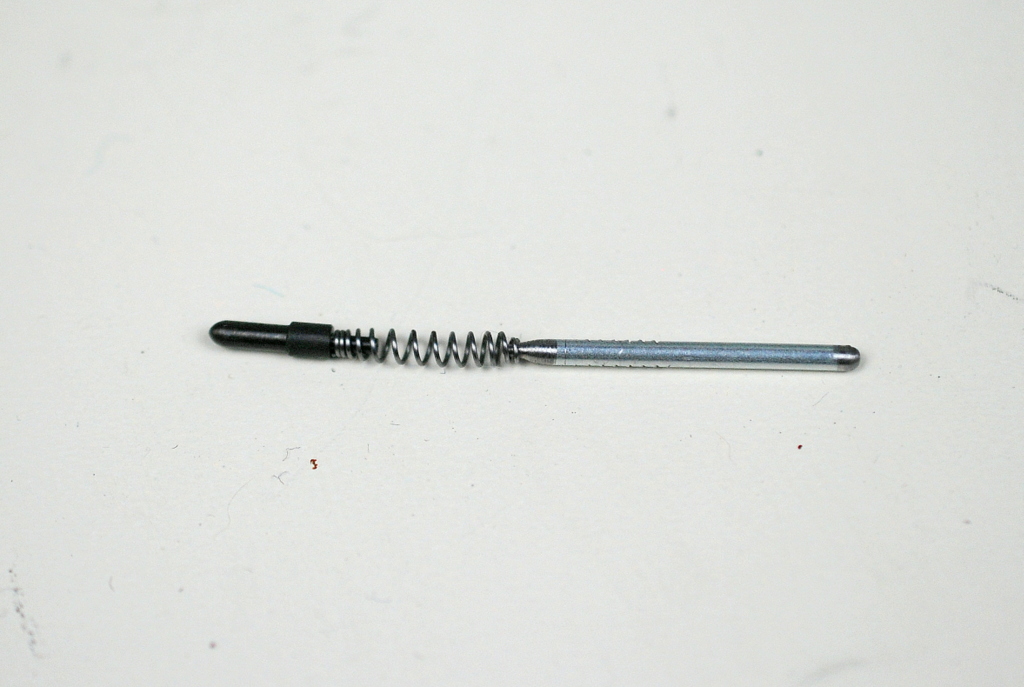
It turned out I had given myself a bit too much working allowance on the mandrel, and had to cut it down by around 2mm and rework the end, because it was too long even with the spring completely compressed. I chose to redo the safety end as that was easier to get right. After that I simply inserted the spring-plunger combination, which fit in very nicely.

And finally, all that was left was to reinstall the safeties and the slide.

I got a very nice, smooth yet crisp movement of the safety from this endeavour. I guess this mostly goes to show you don't always need to buy spare parts if you can make them. Have you made your own spare parts? Let me know in the comments.
Now I'm off to put this baby in a box and ship it off to a new owner. More projects coming up!
Thursday, 16 July 2015
No Hands Reload
Okay, the title is slightly misleading since I obviously still have hands and use them, but whatever.
It's again been a while since my last post. Sadly this summer seems to be wasting away in the airsoft department. I can't even remember when the last Sunday skirmish took place.
I've naturally been scratching the itch by getting more gear, and yesterday during a dull moment I started playing around with some of the new stuff I got, and this is what came out of it.
The plate carrier is an ACM MBSS replica, the FastMags are also non-brand knock offs. They're also actually for 7.62 magazines, but AK mags won't fit in there right side up due to their large bottom plate. The much slimmer AR mags still fit in fine and the pouches had a very positive retention even with them. I'm not sure of the actual feasibility of this method. What are your thoughts? Could this actually be used or is this just silly derping?
Well, that's it for now. Hope to return shortly with actual tech content!
Friday, 19 June 2015
Fixer-upper Part 2: TM AK-47
So, it didn't exactly take long for me to buy another malfunctioning second hand gun with dreams of nursing it back to health.
Patient: Tokyo Marui AK-47
Symptoms: Without trigger pull, begins firing as soon as selector is moved off from safe

This time I got myself a classic, an authentic TM AK-47. This was now the second gun I've been sold as having a metal body when that was, in fact, not the case. This one was sold as a TM, and I purposely asked the seller (who was in another town) to make sure if the body was metal. I knew Maruis typically aren't, but I was prepared to entertain the idea that it would have had its body swapped. The owner seemed a bit less knowledgeable, but as the price was quite low, I took the chance. When it arrived, though, plastic it was.
The non-metallic body issues were quite nicely alleviated, however, by the fact that out of the four metal "hi-cap magazines" that accompanied the gun, only one was actually a rattling BB bottle, and the other three were proper Marui regular size mags (holding around 70 BBs). I had prepared to resell the useless mags and get proper ones at a later point, but now there was no need.

All the original wood imitation externals and the bolt carrier had been painted black (poorly) and the paint on most of the magazines had worn down quite nicely. This immediately sent my mind on a trip to a post apocalyptic setting or a STALKER themed game. That is actually the look I'll be going for with this thing, more on that in another post later.
Since I had been toying with the idea of changing all my guns and batteries to Deans connectors anyway, this seemed like the perfect time to take my first steps in that direction.

The old connector came loose pretty nicely by just pulling on it with pliers, which saved me the trouble of having to strip the wires. After that, it was just a case of soldering the new connector on.
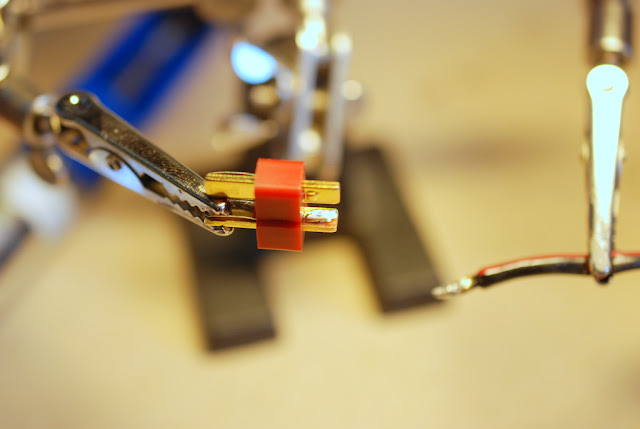
The helping hands are a life saver when you need to solder stuff onto other stuff, and I quickly had the connector on. Next was the battery. I decided to use an old, low power NiMH battery as a test bed, so as to not mess up a more expensive and much more useful LiPo. All went well, though (which, considering this blog, is rather unusual). Pretty much the only two things I could have screwed up, though, apart from forgetting the shrink wrap, were to either solder the connector pins on the wrong way, or worse, cut both battery wires at the same time, shorting the battery with the cutters in the process. I hear the latter especially is possibly a Bad Thing™.

Since I luckily managed to avoid both of the above, I now finally had some juice to fire up the AK for the first time. I turned the selector down from safe, and sure enough the thing started shooting right away. Something was obviously pretty wrong on the inside.
I unplugged the battery and began educating myself on how to open up the gun so I could get to the internals and figure out what was going on. Turns out it's not too hard to do, but I managed to break something in the process. I didn't unscrew the hop up adjustment tab, which when I tried to get the cover off, bent finally and broke the plastic piece of the cover that has the graduated sticker on it. No real problem, though, it's not really a functional part.

As I continued taking the gun apart, it became apparent that the/a previous owner had painted the gun with all the parts still on, as is evident from the image above showing the part of the body that was under the fire selector. The gas tube inside the front handguard also had some interesting splatter pattern going on.
Once I got the gearbox out of the gun, it began looking as though the gun had never been taken apart even once.

The dirt and grime in the picture above continued on the inside as well. What isn't shown here is the fact that the GB shell was held together with Torx head screws, not the usual Phillips ones. Guess that might have deterred a less enthusiastic mechanic, but not this one.

As I separated the gearbox shell halves, it was pretty clear something was in the wrong place. How the spring (between the spur gear and the end of the piston above) had managed to stay out of the gears so far was definitely beyond me, but I was certainly happy that it had.

A pretty clear picture of what was (most) wrong with the gun had now formed. The trigger switch return spring had broken just from the end where it's hooked on the post of the GB shell. Before figuring out what to do with it, though, I went through the other parts in case they needed cleaning or replacing.

The head of the piston was covered in a grimy, oily residue which had bits of dirt stuck on it all around. It was almost as if I was looking at an AK that had been subjected to a real steel torture test.

The extremely dirty piston had naturally also ground away at the cylinder wall, which was full of scratches and this one weird, large, deep scratch.

The light alloy sector gear (pictured from the flip side above) had its last tooth worn down cleanly, apart from a small flange that had been left behind. One more for the pages of the upcoming international bestseller Never Seen That One Before. The gun had basically short stroked itself somewhere along the way.

The dirty insides continued with the nozzle, the contents of which are seen above on the two ends of the Q-tip. I didn't dare even look inside the barrel at this point.

The trigger contacts had also certainly seen better days. The pitting is pretty extensive in my opinion. I took a small file to the metal it and filed it back down to a smooth surface on both sides.

I soaked all the metal parts in brake cleaner to get the old grease and dirt off. All of that residue is seen above. I was sure the gun would work a bit better without all that inside. Or was this in fact the mystical Marui magic dust without which the gun was ruined? Only time would tell.

As mentioned above, the trigger switch return spring had broken completely. It did look like it had also been between the gears at some point, as is evident from the bending above. Since I didn't have a replacement spring, my first thought was to see if I could re-use use this spring somehow.

I took two pairs of small pliers and bent the broken spring somewhat, so that the shape again resembled that of the original.

After a bit of fitting and cursing, my fancy makeshift repairs seemed to certainly do the trick! The switch was sliding back and forth just the way it should.
Since I hadn't located any other problems on the gun, I came to the conclusion that the always-on trigger was the only culprit, and began putting the gun back together, because I wanted to test fire it now with all the parts functioning.
Everything went pretty smoothly there, I re-greased everything and quickly tested the compression, which turned out to be surprisingly good, apart from the nozzle which had no o-ring.
Once I had the gun in one piece again, I set up the chronograph to see what kinds of results I would get.
With an 0.20g BB, the chrono read around 80 m/s (262 FPS), and with a 0.25g, 70 m/s (230 FPS), so around 0.6 J. It was obviously rather underpowered even by Marui standards, but this was to be expected with the self-short-stroking sector gear, the leaky nozzle, and what must be the original hop-up bucking. Since I had no replacement parts, I set the gun aside until I found some, particularly a new sector gear and spring.


Patient: Tokyo Marui AK-47
Symptoms: Without trigger pull, begins firing as soon as selector is moved off from safe

The non-metallic body issues were quite nicely alleviated, however, by the fact that out of the four metal "hi-cap magazines" that accompanied the gun, only one was actually a rattling BB bottle, and the other three were proper Marui regular size mags (holding around 70 BBs). I had prepared to resell the useless mags and get proper ones at a later point, but now there was no need.

All the original wood imitation externals and the bolt carrier had been painted black (poorly) and the paint on most of the magazines had worn down quite nicely. This immediately sent my mind on a trip to a post apocalyptic setting or a STALKER themed game. That is actually the look I'll be going for with this thing, more on that in another post later.
Day 1
The gun came with the large Tamiya connector, but with no batteries, as I purposely did not want to have the previous owner's NiMHs lying around, since I've moved on to using LiPos rather exclusively. All the batteries that I had, though, naturally had the mini Tamiya connectors, so I could not test fire the gun at all.Since I had been toying with the idea of changing all my guns and batteries to Deans connectors anyway, this seemed like the perfect time to take my first steps in that direction.

The old connector came loose pretty nicely by just pulling on it with pliers, which saved me the trouble of having to strip the wires. After that, it was just a case of soldering the new connector on.

The helping hands are a life saver when you need to solder stuff onto other stuff, and I quickly had the connector on. Next was the battery. I decided to use an old, low power NiMH battery as a test bed, so as to not mess up a more expensive and much more useful LiPo. All went well, though (which, considering this blog, is rather unusual). Pretty much the only two things I could have screwed up, though, apart from forgetting the shrink wrap, were to either solder the connector pins on the wrong way, or worse, cut both battery wires at the same time, shorting the battery with the cutters in the process. I hear the latter especially is possibly a Bad Thing™.

Since I luckily managed to avoid both of the above, I now finally had some juice to fire up the AK for the first time. I turned the selector down from safe, and sure enough the thing started shooting right away. Something was obviously pretty wrong on the inside.
I unplugged the battery and began educating myself on how to open up the gun so I could get to the internals and figure out what was going on. Turns out it's not too hard to do, but I managed to break something in the process. I didn't unscrew the hop up adjustment tab, which when I tried to get the cover off, bent finally and broke the plastic piece of the cover that has the graduated sticker on it. No real problem, though, it's not really a functional part.

As I continued taking the gun apart, it became apparent that the/a previous owner had painted the gun with all the parts still on, as is evident from the image above showing the part of the body that was under the fire selector. The gas tube inside the front handguard also had some interesting splatter pattern going on.
Once I got the gearbox out of the gun, it began looking as though the gun had never been taken apart even once.

The dirt and grime in the picture above continued on the inside as well. What isn't shown here is the fact that the GB shell was held together with Torx head screws, not the usual Phillips ones. Guess that might have deterred a less enthusiastic mechanic, but not this one.
As I separated the gearbox shell halves, it was pretty clear something was in the wrong place. How the spring (between the spur gear and the end of the piston above) had managed to stay out of the gears so far was definitely beyond me, but I was certainly happy that it had.

A pretty clear picture of what was (most) wrong with the gun had now formed. The trigger switch return spring had broken just from the end where it's hooked on the post of the GB shell. Before figuring out what to do with it, though, I went through the other parts in case they needed cleaning or replacing.

The head of the piston was covered in a grimy, oily residue which had bits of dirt stuck on it all around. It was almost as if I was looking at an AK that had been subjected to a real steel torture test.

The extremely dirty piston had naturally also ground away at the cylinder wall, which was full of scratches and this one weird, large, deep scratch.

The light alloy sector gear (pictured from the flip side above) had its last tooth worn down cleanly, apart from a small flange that had been left behind. One more for the pages of the upcoming international bestseller Never Seen That One Before. The gun had basically short stroked itself somewhere along the way.

The dirty insides continued with the nozzle, the contents of which are seen above on the two ends of the Q-tip. I didn't dare even look inside the barrel at this point.

The trigger contacts had also certainly seen better days. The pitting is pretty extensive in my opinion. I took a small file to the metal it and filed it back down to a smooth surface on both sides.

I soaked all the metal parts in brake cleaner to get the old grease and dirt off. All of that residue is seen above. I was sure the gun would work a bit better without all that inside. Or was this in fact the mystical Marui magic dust without which the gun was ruined? Only time would tell.

As mentioned above, the trigger switch return spring had broken completely. It did look like it had also been between the gears at some point, as is evident from the bending above. Since I didn't have a replacement spring, my first thought was to see if I could re-use use this spring somehow.

I took two pairs of small pliers and bent the broken spring somewhat, so that the shape again resembled that of the original.

After a bit of fitting and cursing, my fancy makeshift repairs seemed to certainly do the trick! The switch was sliding back and forth just the way it should.
Since I hadn't located any other problems on the gun, I came to the conclusion that the always-on trigger was the only culprit, and began putting the gun back together, because I wanted to test fire it now with all the parts functioning.
Everything went pretty smoothly there, I re-greased everything and quickly tested the compression, which turned out to be surprisingly good, apart from the nozzle which had no o-ring.
Once I had the gun in one piece again, I set up the chronograph to see what kinds of results I would get.
With an 0.20g BB, the chrono read around 80 m/s (262 FPS), and with a 0.25g, 70 m/s (230 FPS), so around 0.6 J. It was obviously rather underpowered even by Marui standards, but this was to be expected with the self-short-stroking sector gear, the leaky nozzle, and what must be the original hop-up bucking. Since I had no replacement parts, I set the gun aside until I found some, particularly a new sector gear and spring.
Day 2
As luck would have it, I got some very slightly used second hand standard XYT steel gears and a new plastic piston and piston head for pretty cheap, and a completely unused second hand Vanaras green spring, which corresponds to an M110. I also happened upon a bundle of three more Marui metal regular capacity magazines, which brought my total to six. Those should certainly last a while for sure.
This time when I took the gun apart to install the parts, I also took care to unscrew the hop-up adjustment nub. It made removing the cover a whole lot easier.
Since the gun had originally also come with plastic bushings, I ventured to change those. As luck would have it, I had a set of 6mm ball bearings lying around from when I began working on the AUG and had mistakenly ordered the wrong size. It's good I have a hard time getting rid of stuff.
With the new(ish) parts in hand, I set to work. I decided to re-shim the gearbox as well while I was at it.
After everything was set and the GB was back together, I noticed the motor had some trouble turning the stronger spring. At first I thought this might have something to do with the plainly sucky NiMH battery I was using so, encouraged by my success with earlier soldering, I decided to put a Deans connector on a stick LiPo as well.
Even with a fully charged LiPo the motor would occasionally not cycle all the way on semi-auto. Again my scavenging nature came in handy, however, as I still had the original motor from the AUG.
Changing the motor (naturally) brought on a new, interesting problem. Since I had shimmed the gun using the Marui motor, and the AUG motor was just slightly different spec, the pinion gear now connected much too tightly with the bevel. Furthermore, the AUG motor sat ever so slightly higher than the Marui original that even turning the motor height adjustment screw all the way down was not enough.
Rather than reopen and re-shim the whole gearbox for a second time, I opted for another solution. I took the motor out of the cage, and screwed off the adjustment set screw.

The screw head was a raised one, so I took out my trusty file set again and went to work.

After some ecstatic rubbing, I had managed to make the tip disappear. With the new flat headed adjustment screw, the motor was able to sit low enough to mesh with the gears very nicely, and I finally got the GB to cycle with the LiPo. And it did it ever so nicely. After a bit of height adjustment, the sound of the GB cycling also became very smooth, which I was definitely happy about.
The gun had originally been wired to the rear, but I didn't like the hollow sound of the stock or the fact the battery was bouncing around in it, and thus made one final move, to rewire the gun to the front. This would also allow me to use the same stick LiPo I had bought for the MP5.
After some cutting and soldering, and some more soldering, and finding a new place for the fuse, I finally had everything back in working order. Then I naturally had to chrono the gun again to see the fruits of my labour.
I was slightly disappointed to see that I was "only" getting around 92m/s (302 FPS) on a 0.25g, which is about 1.06 J, but at least the figures were on an incredibly small spread. I had a few times when two consecutive shots both read the same exact speed down to the tenth of a second.
Despite the test results, I declared this leg of the project done at this point. After all, the gun was now fixed and was performing a whole lot better than it had when it arrived. It was ready to be taken out to the field at the first sight of opportunity. Later on, I will definitely still check and most likely change the hop-up bucking and the nozzle, which should both increase compression and will most likely get the gun to the expected power range of around 1.2 J, or around 100m/s on a 0.25g.
In a later post I will also get back to the visual modifications I have in store to properly post-apocalyze this gun and the magazines for end-of-the-world scenarios.

Subscribe to:
Posts (Atom)