Saturday, 2 May 2015

Hi Maintenance

I recently bought myself another gas blowback pistol. It's not like I actually needed one, but I saw this one on a local airsoft marketplace on Facebook and just decided to have it.


There she is, a WE Hi Capa 5.1. The picture is after I did some work on her, all of which is detailed below. But first, some background.

I've never really been into 1911s, I know some people swear by them both in the real steel world as well as in airsoft. Personally, the Hi Capa looks visually a lot more pleasing than the original 1911 design. Especially the models like this one with the sharp angle on the trigger guard. Interesting how such a small thing can make a big difference. Still, I wasn't really in the market for a new pistol, but when this particular one floated by me in the marketplace, something about it caught my eye. Since the price for the gun and one functioning magazine fit my wallet nicely, I decided to go for it.

The seller was from another city, but he was kind enough to send me extra photos of the externals. A few scratches, nothing major. He did say that it had been used for couple of years, but that it worked ok, and that the right hand safety was a bit loose but didn't really affect use. I didn't enquire any further, and we agreed on the deal. He mailed me the gun the very same day, which I was very happy for. Caveat emptor, though, it seems. While the gun did function, yes, and the safety was loose, sure, what I wasn't told was that there were a few more shortcomings.

After receiving the gun I naturally filled the magazine with gas and fired off about twenty or so BBs. Every round cycled and the gun had a very nice kick to it. One of the first thing I noticed handling the gun, though, was the way it rattled. Several parts seemed to have rather large clearances. I couldn't tell if this was by design or from wear.


Just gently twisting the slide from side to side produced a rather noticeable gap between the frame and slide. Another thing I noticed was that the slide stop was incredibly loose. The pin would move from side to side several millimetres just by turning the gun sideways.


It was obvious the gun had seen better days, and as I test fired it some more, I came to notice that the the slide stop barely functioned. The slide would lock back about one time out of three or so on an empty magazine.


When it did work, the slide stop only barely caught the edge of the cutout, and the wobble of the frame allowed it to slip out rather easily. There was also some gooey residue on the slide stop and frame, which I assume is from some haphazard tape related attempt at fixing the slide stop on the previous owner's part.

The safeties didn't fare too well either. The grip safety was completely non-functional, so you could discharge the weapon without depressing it at all. The thumb safety had no resistance to it, and would at times engage by mistake.


As the seller had mentioned, the right hand side thumb safety was extremely loose, and it did indeed have several millimetres of upward travel before the left side safety would move at all.

The obvious next move was to take the gun apart. I had to go online to see how that is done on a 1911. If you're curious regarding that as well, it's done by moving the slide back enough so that the smaller cutout (see image above) on the slide meets with the tallest part of the slide stop. At that point a small tab on the inside of the slide stop is no longer stopped by the slide. When I did this on my pistol, the slide stop would simply fall out if the gun was held sideways. With the slide stop out, the slide is free to move forward and be removed.

Not being familiar with 1911s, I didn't even realize everything that was wrong at this point. If you know your 1911s, you might have already figured out a couple more things which I didn't know of.


Looking at the slide stop and the cutout on the slide in detail, it was obvious they had severely worn down and created a slanted contact surface, so that the force of the recoil spring slamming the slide forward would push the slide stop out and down, and it would simply slip off the edge of the cutout. It certainly didn't help that the slide stop was so incredibly loose.

I figured that it had simply worn down as everything else seemed to have on this gun. I decided to fix this with a bit of super glue and material from a beer can, so that the pin on the stop would have a tighter fit and the end of the stop would ever so slightly turn inwards, towards the gun.


I started off with some brake cleaner to get rid of all lubricants and other contaminants both on the pin and the strips of can I'd cut into size. Then I pre-twisted the can strips around a small screwdriver so that they'd hug the surface better (after I'd taken this photo where the upper strip doesn't attach properly). A toothpick was a very handy tool when applying the glue onto the pin, and a pair of tweezers helped get the strips in place. This was the first, but nowhere near the last time when my scale modelling experience and tools came in handy with this particular gun.

Once the glue had set, I filed the edges of the can strips down so that they were flush with the pin surface. The side wall of the can was only 0.10 millimetres thick (I callipered it, that's just who I am), but we are talking very small clearances here. After that it was mostly just testing, filing, testing, filing, testing and filing some more, until I found the perfect fit. It couldn't be too snug, or the magazine follower would not move it, and not too loose, or it would not sit properly in place.


Speaking of magazine followers, I thought to aid things further by stretching out the follower spring, thus giving some extra oomph to the follower and achieving a more positive lock on the slide. As things stood at this point, the magazine follower would not even lift the slide stop up all the way.

Taking the follower and spring out was rather easy. You just need to push out and then pull off the pin near the top, take off the feed ramp, and make sure to hold onto the follower, lest it fly off with the spring. Once out, it's rather straightforward just to stretch the spring a bit an put it back in. I, however, decided to go one further.


A bit more superglue and can bits were in order. I cut off a very thin strip and, with some tweezers, bent it over itself a couple of times to produce an extension to the magazine follower. With the strip bent, I cut the extra bit off and attached the extension into place with a rather hefty load of glue.


After this, I put the magazine together to see how things had improved. As an afterthought hours later I realized I should have put the strip on sideways and used the extra bit of the strip to attach it to the side of the follower for an even more secure fit. Then again, this is not exactly a part that's under high tension.


Even after this fairly remarkable improvement, the slide still would not lock back every single time I racked it with an empty magazine in the gun. I thought now would be a perfect time for some metalworking.

As I'd mentioned before, both the slide stop and the cutout on the slide had worn down rather lot. I figured straightening out the slant on both would not only ensure the slide stop didn't want to get pushed outwards any more, but that there would be even more space for the stop to jump up because of the increased clearances.


I taped off the slide a bit to make sure I didn't scratch it with the rotary tool I used (after I'd scratched it the first time, of course). A small grinding head, steady hands, and a lot of patience, and I finally managed to remove the slant from the slide and change the angle of the end of the cutout to also be a bit more vertical. Then, with a small hand file, I evened out the end of the slide stop to remove the slant from it as well and make it fit the cutout.


I think I made a pretty good job at mating the surfaces. The slide stop issue was now mostly resolved. It would still occasionally, when inserting a magazine, pop outwards a bit, so that the follower was no longer touching it. I decided to move onto the thumb safety, however.

With the slide off the frame, the safety lever would rise up a bit higher, and I could then just pull the two pieces apart. The safety levers were linked by a triangular head and slot, and the wobbling was due to the pieces having worn down. As before, I reached for the beer can, cut off a strip and set off to glue my fingers to the workpiece.


With the strip in place it was again time to simply file it down until the fit was snug. When I was happy with the fit on the outside of the gun, I went to reinstall it. And that's when a strange, small, oblong piece fell out. Luckily I noticed where it came, a small opening parallel to the frame above the grip.

After some head scratching and online searches, I came to the conclusion that it is something called a slide stop plunger. The things that typically hang out with it, the spring and a thumb safety plunger, were nowhere to be seen. This was pretty much the moment the penny finally dropped.

The reason the slide stop and the safety were so loose was because they were supposed to be held in place by spring loaded pieces. I guess the safety plunger and spring had gone flying when the previous owner took the safety apart, with the slide stop plunger left in place. For a while I tried to think of something to scavenge a spring small enough from, but after opening a couple of pens and such, I came to the conclusion that I simply did not have a spring that small anywhere. Onto plan B, then. After all, I reasoned, it didn't have to be a spring, just springy enough.

Wire. I have loads of different sized wire lying around. It didn't take too long to find the proper size.


After I'd cut the wire to length (with some to spare), I pulled out the copper so I could use the jacketing as a spring. Since the plunger for the other end was missing, I had to improvise. With all the toothpicks I'd used and left lying around, it didn't take long, though.


The wire jacketing was just the right size to fit the end of the plunger and the head of the toothpick in firmly, and fit in the hole in the gun. It's not as good as a proper spring, but once installed, the thumb safety became very crisp and the slide stop would sit in place very tightly. Also, now my gun is partly made of wood, which makes it at least 213% more classy.


One negative side did come with the plungers installation, though. With the safety installed, the slide stop became very tight, since the plunger was pressing against it.


I went to my trusty file again, and smoothed out the end until it was pretty nicely polished and no longer made such heavy contact with the plunger. Some lube here and there, and I had a very positive lock on each and every racking on an empty magazine.

One final thing I just had to take care of, though. The rattling slide. Since I'd already spent so much time and effort, it would have felt stupid to leave the slide-frame connection so loose. Guess which materials I used?


Cut strips, clean with brake cleaner, apply super glue with toothpick, place with tweezers, hope it sticks. I put one strip on the side and one on top, so as to make the slide sit tighter both in the horizontal and vertical planes. Putting the top shim (that's what they basically are) on the bottom of the rail allowed me to seat the slide lower down, which would further help with the slide stop. After installing the shims, I again carefully filed the ends to make them sit more flush with the rail.

The Hi Capa frame has these short rails to connect the slide to the frame (unlike my P226, for example, where the rail is as long as the frame), one pair on top of the trigger, the other one just in front of the hammer. I put shims on the rear rails as well, but soon noticed it was not such a good idea. On the front rails the slide is in constant contact with the shims, but on the rear rails the contact is broken when the slide cycles. The thumb safety cutout got caught at least once on the rear shims when testing, so I removed the shims from the rear completely. The ones on the front seem to do the job very well, though.

After all this, I lubed up all the moving parts, put everything back together, removed the previous owner's gunk from the outside and tried it out.

It. Is. Sweeeeeeeet. Everything works, the gun no longer rattles, I get a slide lock every single time, and all in all it feels so much better than when I got it. It just might be that now that I've put so much love and sweat into this thing, the P226 will have to take a back seat.

One final pic from the mess of a work area that made this happen. I'm thinking of looking into the issue with the grip safety, but that is for another day.


Saturday, 21 March 2015

Yeah I Broke It

So, I had this idea where I thought I might just ever so slightly bend the magazine release lever on the MP5K PDW forwards so that mag change would be easier. Let me tell you this: The light alloy metal used on this gun (and many others) does not, I repeat, does not bend. It will resist up to a certain point and then...

Oh well, at least there's more tinkering ahead once I replace that lever. I'm creating a demand for more posts right here! A gift that keeps on giving, as it were.

That's out of the game. 

Had I been smart (yeah), I could have taken a magnet to the piece to figure out if it's steel and as such bendable, but that's all a bit late now. I'll keep that in mind for the next time a bend lust washes over me.

Good thing there's still a mag release button on the right hand side, so the gun is still usable. I'll get back to this once I find a replacement part.

Thursday, 19 March 2015

A New Battery Will Make Me Go "ROF ROF ROF!"

Last weekend was the first game since ages, and I got to run around with both the new MP5K PDW as well as the G36C with its M4 magwell. To make it really short and sweet: Everything went extremely well. Mostly anyway.

M4 magwell

In one very stressful situation I didn't quite manage to slap in a new M4 mag as quickly as I would have hoped, but I put that solely on the newness of it all. Later on it went pretty much as well as I'd expect. Once you get the "reverse AK" reload down, it's definitely quicker than some rifles (the AUG for example). No feed issues whatsoever through 400ish BBs from several magazines.

First slide the back end in, then twist forward while pushing up. The magwell bevel will guide the magazine in perfectly.

MP5K 

The MP5K performed very nicely, and the lightness of it made it a real joy to use. Very quick to pop out of cover and hose someone down. One of only two gripes came up after a rather lengthy episode of running around, when my goggles developed a nice film of moisture on their upper edge, exactly on the spot where you'd need to look through to be able to aim down the very low-sitting iron sights that I was using at the time. This is easy to alleviate with a scope mount and a holo or reflex sight, which will change your head position to a more upright one when aiming.

It does look slightly comical with the sight. The distance from the top of the sight to the bottom of the mag is only slightly less than the overall length of the gun with the stock folded.

The other problem I ran into was with trigger lag, or more accurately the time it took the motor to cycle the action. At one point, I was intending to quickly pop out of cover, shoot one single well aimed shot and take cover again. As more seasoned players are surely aware, the default NiMH batteries that come with guns aren't all that great powerwise. I peeked over the edge of cover, tapped the trigger and only heard the motor spin for a bit, but not enough, so no shot was fired. I had to slink back into cover as I was immediately spotted and had no time to shoot again. Obviously what happened was that the motor had wound the spring back a ways, but not quite enough to make the sector gear release the piston.

To treat the trigger lag issue, a better battery with more amperage is the obvious first choice. It's easy and quick to do, and has worked on my other two AEGs very nicely.

As I have been toying with the idea of upping the rate of fire on the MP5K anyway, I thought I'd devise a little test to go through the batteries I currently have, possibly finding a good, ROF-upping battery replacement that way.

Battery testing

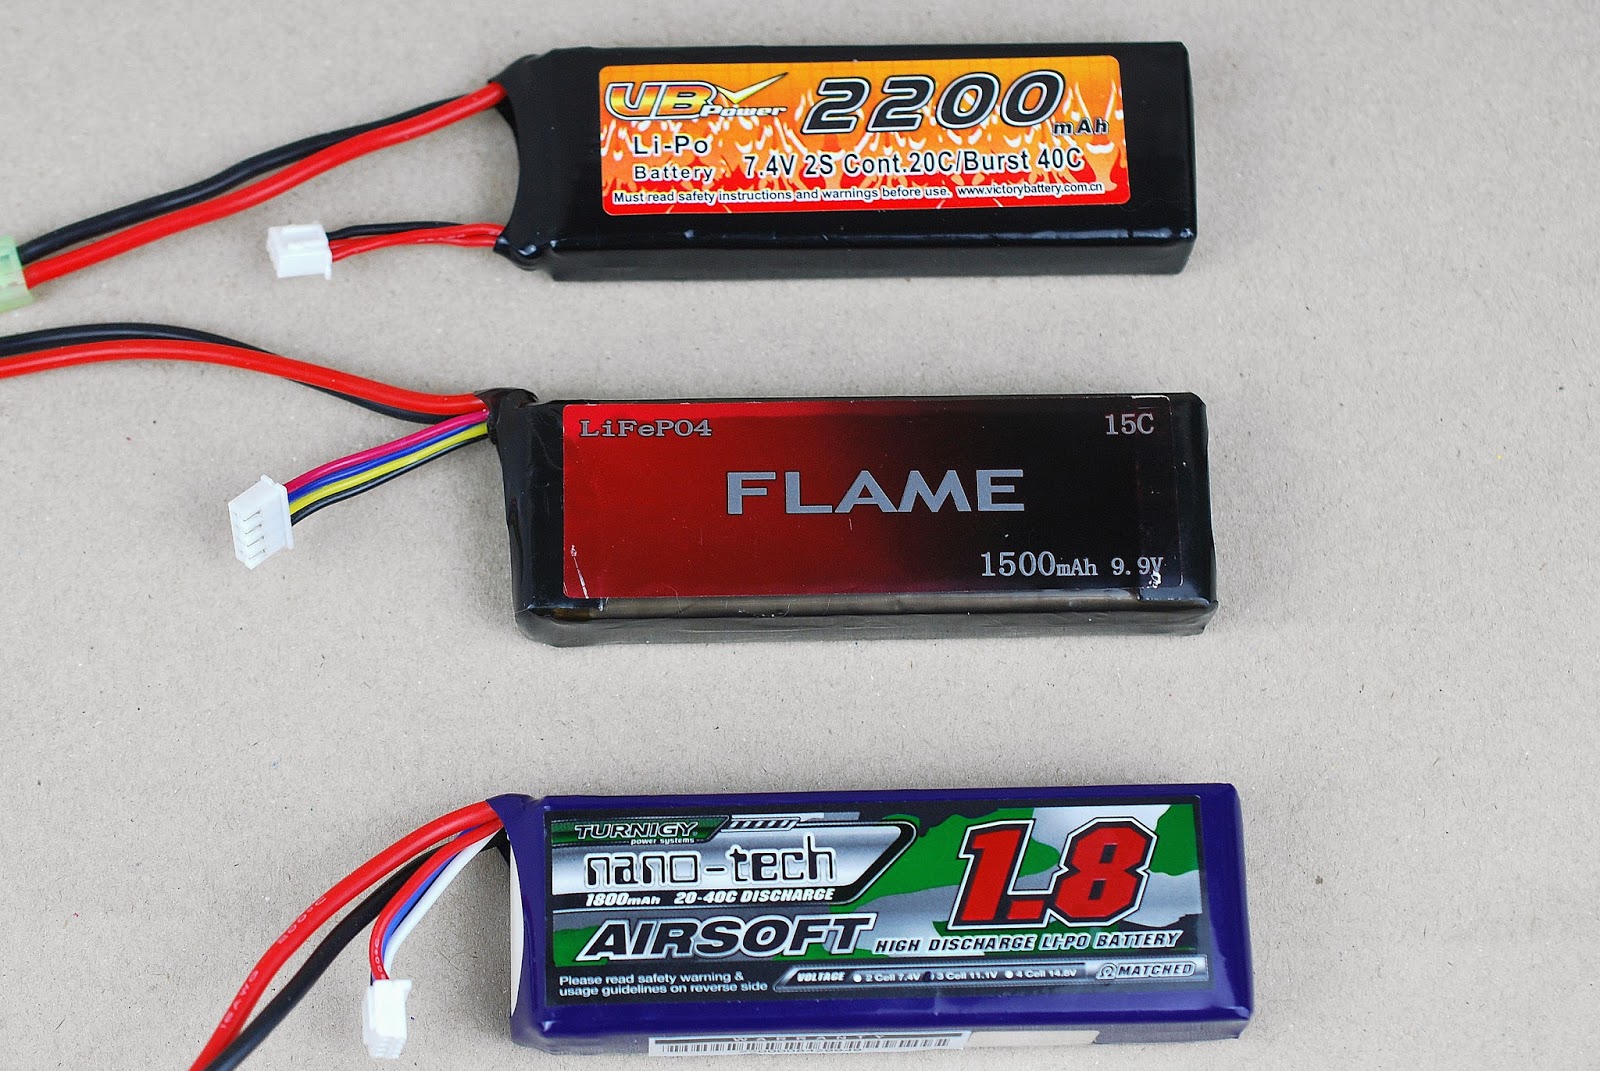
I set up the chronograph (UFC Pro), loaded up some mags and went to work. The batteries used, in addition to the stock 8.4V NiMH that came with the gun, were the following:

  • VB Power 7.4V LiPo (2200 mAh, 20-40C)
  • Flame 9.9V LiFe (1500 mAh, 15C)
  • Turnigy 11.1V LiPo (1800 mAh, 20-40C)


All batteries were charged fully before starting. They all have their stock mini-Tamiya connectors at this time. I have gold-plated Deans connectors already on order, and will repeat this test once they arrive and I have them installed. That should give some hard data on what kind of effect (if any) the connector has on the system's efficiency.

I listed the batteries and their respective rates of fire (ROF) of in both rounds per minute and rounds per second on the table below.


Battery ROF(rpm) ROF(rps)
8.4V NiMH 750 12.5
7.4V LiPo 857 14.3
9.9V LiFe 1000 16.7
11.1V LiPo 1500 25


One interesting point of note is that the lower voltage LiPo outperforms the higher voltage NiMH by a fair margin. According to my understanding, this is simply due to the fact that the NiMH battery basically gives out too little power for the motor to turn effectively.

With all the Lithium batteries, it was practically impossible to get the gun to half-cycle, so any new battery should at least fix the non-firing situation I encountered while playing.

As for upgrading the gun, I would like to reach a ROF roughly around 20 rps (1200 rpm). Of course, with my luck, that lies directly in between the LiFe and the the high voltage LiPo. The latter would empty the 90 round midcaps in 3,6 seconds of full auto. Yes, I'm sure it would be fun for a while, but the internals would likely break somewhere (at least the trigger contacts would suffer without a MOSFET), and I'd be out of BBs really quickly.

I'd be lying if I said that during the test I wasn't even slightly worried something would go wrong with the 11.1V LiPo, especially since the spring in the MP5K only gives out about 1 Joule and the gearbox is completely stock. With no angle of engagement correction and a fairly low powered spring, I was definitely expecting some sort of premature engagement. No sign of that, though, during the 40ish rounds I put through the gun with the high voltage LiPo. I'm sure something would break in the long run, though.

Furthermore, finding an 11.1V stick LiPo that would fit in the gun might also prove somewhat problematic. I am pretty fond of the LiPo batteries in general, though, so I'll most likely replace the stock battery with a 7.4V LiPo when the time comes. Apart from that, I'm not entirely sure at this point which way to go about reaching the 20 rps mark. High speed gears, a new motor to turn them, something else? I'm open to all suggestions.

Friday, 13 March 2015

G36C M4 Magazine Well Conversion

As mentioned in an earlier post, I recently got some magazines to go along with the M4 magwell conversion for the JG G36C (G608). In this post I'll go over the installation and some quick testing.

The idea behind the conversion kit is to enable the G36 series rifles to use M16/M4 magazines instead of the proprietary H&K ones. The magazines' smaller bulk, higher availability and proliferation are the reasons I opted for the conversion. Of course it also changes the look of the gun somewhat.


Several companies make these airsoft conversion kits. Mine is by BattleAxe, and I chose it because of the many praises I read about it.


The kit is a simple, one piece item that's intended to replace the original magwell of the G36. I hear the latest generation JG G36s have a different hop-up mechanism compared to the old ones and thus require a different kit or some modifications to install and/or feed properly. If you're getting one, make sure to compare it to the original magwell before purchase.

Installing the kit itself is a very simple process, but mine did require some extra work.

Installation

To start off, you need to remove the old magwell. Start by pulling out the pin next to the trigger guard.


After removing the pin, push the magazine release lever as if you were removing a magazine and simultaneously pull the magwell downwards from the end closest to the trigger. It will tilt downward, out of the gun, and you can then remove it.


In a perfect world, you would simply reverse this process to install the conversion kit. This is not one, sadly. Some adjustment work was required first. To begin with, the reverse side pinhole on the kit was noticeably smaller than the pin, so I had to widen the hole a bit.


I started off with a rotary tool and finished with a small round hand file, testing the fit until the hole was just large enough. I didn't want to make it too large or the magwell might wobble when installed.

A couple of spots also required some extra work as there were some burrs left over from moulding. This was especially true regarding the tube that mates with the magazine.


I wanted to make the edge as clean as possible in order to avoid any problems with feeding and to eliminate the risk of material breaking off and entering the gun (Paranoid? Possibly. At least it doesn't hurt too much). I used a file and a crafting knife here. The plastic is apparently fibre reinforced, judging by the scraping sound it made when cut. That should add some longevity.

Once the pinhole and the feed tube were filed and wiped down to remove any residue, it was time to install the kit. To do so, you simply place the notches on the front of the kit in the tabs on the receiver, just like the original magwell, and snap into place. The kit was ever so slightly wider than the receiver, so it did not slide in without a little bit of force. The upside is that it will sit in place very snugly.


Once the kit is in, replace the pin, making sure to mate the small ridges on the pinhead with the grooves in the pinhole.


As can be seen here, under intense light the conversion is of a different colour to the receiver, but under normal lighting conditions the difference is usually not even noticeable.

That is the installation, finished. The original magazine release lever becomes non-functional, and you can only use the button on the left-hand side. Not ideal for lefty shooters, but still workable (I guess, from my own awkward attempts. I had no real lefties in store).

Since this conversion requires no modification of the gun, it is completely reversible. Even in field conditions it can be done literally in seconds. If you have the original and the conversion with you, you can alternate between them depending on which magazines you want to use, whenever necessary.

Magazines

As I was shopping around for magazines to use with the conversion, I became rather overwhelmed with the multitudes of choices available. I've never owned an AR, so this was all new to me. You have your standard ones modelled after the real steel 30 round magazines, the short types that mimic the 20 round variant, and both are available in plastic as well as metal. Then you also have both short and long ones in the PMAG configuration, for example. And would sir like his magazines in black or perhaps tan? The choices obviously don't end anywhere near here.

The magazines I ordered were made by King Arms. I had heard that MAG magazines feed nicely with the conversion but alas, all other choices despite their existence, were out of stock at the time.

I have previous experience with KA mags on my AUG, and I'm not totally happy with them. They needed some work to make them feed better, but I hope the M4 magazines are good to go as is.

The magazines in the store were sold without any kind of packaging, and thus each came with its own price tag.

Who doesn't love pulling stickers off stuff? Me.

As always, no matter how carefully I tried to peel them off, the price tags left behind a sticky residue that will ruin any perfectionist's day.

Brilliant.

On the upside, here's a chance for me to share a cool trick I picked up from my SO. To get rid of the glue, you don't need strong chemicals or abrasives, nor would you want to use either here anyway. What you do need is some oil. Simply rub some of it, preferably plant based, on the glue with a paper towel or a rag.

Some olive oil (extra virgin freshly stolen from the kitchen in my case) rubbed on the glue residue

Wait for a bit and proceed to rub the residue gently with said paper or rag. In a process I can only imagine is fuelled by magic, the oil dissolves the glue, letting you simply wipe it away.

Glue-B-Gone!

The last step, in case you don't enjoy oily magazines, is to wipe them down using some soap water, and presto!

Better than new, literally.

Now that my mags were all good looking, shiny, and lightly lemon scented, it was time to move on to some quick shooting testing.

Testing

I loaded up two magazines and shot one in single shots and the other in short(ish) full auto bursts. During those 240 or so BBs, I got no feed problems whatsoever. At least this short initial test would seem to indicate that the King Arms magazines work nicely with the conversion kit as well. They also fit the new magwell very nicely, so there's very little wobble in any direction. The inside of the magwell has some ridges that hold the magazine in place, and I found that the easiest way to insert a mag is a sort of "reverse AK" method, where you slide the rear edge of the mag first and then twist it forward. Regardless of how you put them in, the magazines will stay firmly in place once they lock. When you want to release them, they slide out effortlessly, so at least in that regard there is nothing to complain about. Mag flipping optional.

As a final note, the conversion kit has an s-shaped bend inside it to facilitate the different placement of the feed chutes between the two magazine types. On the G36 magazines the chute sits about a centimetre further back from the front edge of the magazine, so the M4 mags would not meet up with the hop-up without the bend. This will leave you with some extra BBs that fall out when changing mags, but that is a rather small price to pay for the convenience. 


That's all for now. If I run into problems with the conversion in the field, you will be sure to hear about it here. Until next time!

Sunday, 8 March 2015

MP5K PDW Up Close And Personal - Part 2: The Return of a Vengeange

This is the second part of my Galaxy MP5K PDW review that grew into a giant and was split into two. Part 1 here.


Operation

To get the gun in working order, you need to jump through a few more hoops than usual. Or, at least the process is somewhat more convoluted than it is in my other two guns. I guess it's simply due to the small measurements of the gun. It's actually pretty amazing how much stuff fits in such a small space.

Before inserting the battery, you will need to remove the flash hider, the front grip and the buttstock. The flash hider has a fast locking mechanism and can then simply be twisted and pulled off. My flash hider conveniently broke into two pieces when I forgot to remove it before trying to slide the front grip off.


I suppose there was some glue in between the two parts, but not very much. The thing is still very much intact and can be reassembled, but I don't really care to.

To remove the front grip, you need to pull out the pin that also doubles as the front sling point. Problem here is that it is secured by a spring that is strong enough to resist pressing it down with fingers alone. I have to use a screwdriver or other implement to do this, so taking the gun apart in field conditions might prove problematic. Once the pin is out, the front end is free to slide forward and off the gun.


Once the front end is free, you have access to the connector. Now you still need to remove the buttstock to actually be able to insert the battery. The buttstock is similarly held in place by spring secured pins, but they are much less resistant and can be pushed out without tools.


Once the buttstock is loose, you can carefully insert the battery in the space above the gearbox. You need to be careful not to get the wires caught on anything inside.


Once you get the battery in far enough, the connector still needs to be finessed out of the opening in the front. Depending on the angle, it might take a bit of work to actually get it out so you can push the battery all the way in.


There is very little space to work the connectors, but they will eventually fit in there somehow, and you can replace the front grip, the flash hider and the buttstock.

If you want, you can remove the buttstock and just use the end plate to secure the battery in place. The buttstock is connected to the end plate just with two screws.


Once unscrewed, you'll also notice that the sling mount is held in place by a simple C clip. In an ideal world, you could just remove this, push the sling mount base through the hole on the end plate, replace the clip and you'd be good to go.


No there though. The edge of the end plate is so close to the hole that the C clip will not lock in place. The tips of the clip will need to be filed down in order for it to lock. Curious design.


I kept the buttstock on, since I was just about to start test shooting and sighting this thing.

Shooting

Before starting actual target shooting, I chronoed the gun. As advertised, it shot a fairly steady 95-98 m/s (312-321 fps) with 0.20 g BBs. The fire rate was around 860 rpm (14.3 rps). Not bad at all, although there might be some interest for to up the ROF one way or another in the future.

To zero the sights, I set up a small shooting range in the study at home. That enabled me some peace and quiet and a distinct lack of cats that love to jump after BBs rolling on the floor. There's about seven metres from the door to the other end of the room which ends in a large windowsill. Perfect for setting up a target.

I filled a cardboard box with some old newspapers, taped a blank A4 on the front and used brightly coloured Post-Its as the actual aiming point. This way I could replace both the paper and the Post-Its with ease once they were filled with too many holes while still seeing if the shots were missing the target one way or the other.


And they sure were. Missing, that is. The gun kept shooting up and way to the left. First order of business at this point was obviously to check and see if there was something I could do to adjust the sights. The front sight is immovable, so nothing to do there. The rear sight has no elevation controls, but at least there's a rudimentary windage setting. Turn screw, slide sight sideways.


Sadly, this had very little effect on where the BBs went. I even tried to move the rear sight in both extremes just to make sure I was not doing something wrong, but no. Always to the left and up. As I said, there's no elevation adjustment so I'll just have to aim a little low.

Adjusting the hop-up also did very little, since my shooting distance was rather short. Unlike in my other AEGs, this one has a rather awkward hop-up adjustment. There is no wheel as usual, instead the adjustment is done via a white slider inside the front grip. You'll need to remove the front end every time you want to make an adjustment. I guess the idea would be to check the hop-up after hooking up the battery and before putting the gun back together.


I guess something on the gun is a little crooked in the end, which is why the shots don't go straight. I was getting pretty nice groups from the other end of the room, though, which did surprise me. After all, the gun has just slightly more barrel length than a pistol. I even stopped to think if the rear sight was just too small altogether, which would explain the tendency to shoot high. I'm not entirely sure if it is too small or not, but at least not by a huge margin.

To inject something positive here, the MAG midcaps I bought for the gun fed perfectly and I must have shot more than 200 rounds all told in order to zero the gun.

As I sat down nex to the target, I came up with an idea to fix the crookedness of the gun. I folded up a Post-It note and stuffed it between the gearbox and the frame of the gun, which I hoped would twist the barrel in the opposite direction.


I'm happy to report that my makeshift fix worked more than well. The gun is now shooting straight, although still somewhat high. That, though, is a lot less annoying. I'm also thinking of ordering a weaver mount so I can put a holo or red dot on this, which would fix all my aiming woes once and for all.

Conclusion

If you're looking for a cheap, fun little gun, I can definitely recommend the Galaxy MP5K PDW. If you're just starting out, this is a nice, complete package to get you started. If you know your way around guns, this seems like a very fun project base for a high ROF setup, for example.

I have not tested the range of this gun, but I'm sure it will not do too well in a long distance (well, airsoft long) engagement. For indoor games and other close up situations, though, this thing looks amazing. The short length and light weight make it ideal for fast paced gaming. The awkward hop-up adjustment also limits the usability of the gun for anything other than short range where the hop-up does not have so much effect.

All in all, a great little package for a very low price.